Index
|
|
|
|
|
iv |
|
|
|
|
|
|
vi |
|
|
|
|
|
|
1 |
|
|
|
|
|
|
3 |
|
|
|
|
|
|
5 |
|
|
|
|
|
|
6 |
|
|
|
|
|
|
23 |
|
|
|
|
|
|
26 |
|
|
|
|
|
|
31 |
|
|
|
|
|
|
36 |
|
|
|
|
|
|
40 |
|
|
|
|
|
|
45 |
|
|
|
|
|
|
50 |
|
|
|
|
|
|
59 |
|
|
|
|
|
|
76 |
|
|
|
|
|
|
80 |
|
|
|
|
|
|
81 |
Page-(IV)
Highlighting the significance of Yogic exercises, Sadgurudev Sri Swami Sivanandaji Maharaj says, “Regular practice of Yogic exercises even for fifteen minutes a day will keep you fit and make you hale and hearty.
To enable the readers to practice Yogic exercises at their homes, we are bringing out “Yoga Divine-A Self-guide to Yoga’ by Sri Swami Dharmanishthanandaji, the yoga instructor of the Headquarters Ashram. This book has originally been designed as a personal guide for the trainees of All India Services and other Central Government group a services who are taking Yoga classes in the Lal bahadur Shastri National Academy, Mussoorie. The Headquarters Ashram has been rendering the service of Yoga training to IAS officials for nearly half a century.
The ‘Yoga Divine-A Self-guide to Yoga’ which has also been blessed by Worshipful Sri Swami Chidanandaji Maharaj, contains valuable practical instructions on Asanas, Pranayama, Mudras and Bandhas along with appropriate illustrations, We hope that it will be helpful for all those people who desire to keep themselves hale and hearty but cannot spare much time for vigorous exercises and playing outdoor games.
-The Divine Life Society
|
Page-(V)
CONTANTS
Publishers ‘Note……………….. |
|
|
iv |
|
Prayers……………….. |
|
|
vi |
|
Yoga-A Short Introduction……………….. |
|
|
1 |
|
Benefits of Yoga Exercise……………….. |
|
|
3 |
|
Keep Fit series-Energizing Techniques……………….. |
|
5 |
|
|
Part 1 (Anti Rheumatic) Part 11 (Digestive)……………….. |
6 |
||
|
Ophthalmic Yoga (Eye Yoga)……………….. |
|
|
23 |
|
Asana- Standing Category……………….. |
|
|
26 |
|
Surya Namaskara……………….. |
|
|
31 |
|
Shavasana……………….. |
|
|
36 |
|
Supine Category……………….. |
|
|
40 |
|
Prone Category……………….. |
|
|
45 |
|
Sitting Category……………….. |
|
|
50 |
|
Prana and Pranayama……………….. |
|
|
59 |
|
Bandha and Mudras……………….. |
|
|
76 |
|
Meditation……………….. |
|
|
80 |
|
Conclusion……………….. |
|
|
81 |
Page-(VI)
BEGINNING PRAYER
Om Saha Navavatu Saha Nau Bhunaktu,
Saha Viryam Karavavahai,
Tejasvi Navadhitamastu Ma Vidvishavahai,
Om Santih Santih Santih!
Meaning: - Om! May He protect us both (the Teacher and the Taught)? May He cause us both to enjoy protection? May we both exert to find out the true meaning of the scriptures? May what we study become lustrous? May we never quarrel with each other? Om Peace, Peace, Peace!
Meaning- The invisible (Brahman) is the full; the visible the world too is full. From the full Brahman the full the visible universe has come. The full Brahman remains the same even after the full the visible universe has come out of the full Brahman Om peace, peace, peace
Page-1
Yoga is an exact science. It is a perfect and practical system of self-culture. It is the discipline of mind, senses and physical body. It helps the practitioner to attain concentration of the mind, ethical perfection, moral excellence and spiritual calmness. It is the master key to unlock the realms of peace and bliss, mystery and miracle.
Yoga does not consist in sitting cross-legged for six hours or stopping the beatings of the heart or getting oneself buried underneath the ground for a week or a month; these are mere physical feats. Real Yoga is the attainment of the highest divine knowledge through conscious communion with God. The word Yoga comes from the Sanskrit root “Yuj” which God. The word Yoga comes from the Sanskrit rot “Yuj” which means, “to join”. Yoga is the science that teaches us the method of uniting the individual should with the Supreme soul. Of merging the individual will in the cosmic will.
Yoga transmutes the unregenerate nature of the practitioner and raises him to the highest state of Diving glory and splendour. It bestows on him energy, vitality, vigour, longevity and a high standard of health. It infuses in him a sense of security, a new strength, confidence and self-reliance. Yoga brings a message of hope to the forlorn; joy to the depressed, strength to the weak, and knowledge to the ignorant. It kills all sorts of pain, (; ksxks Hkofrnq%jogk) misery and tribulation.
By the practice of Yoga, one can turn out efficient work within a short span of time, resist temptations, eradicate disturbing elements from the mind and attain full success in every walk of life. So Yoga is skill in action. योग: कर्मसु कोशलम it brings harmony in body, mind and soul. समत्व योग उचय्ते Maharshi Pat Anjali tells “Yoga is cessation of all mental modifications.” योग चित्तबृत्ति निरोध: ! Through the practice of Yoga, you can control the subtle forces within the body and command nature. You can unfold latent faculties and develop physical, mental, supernatural and divine powers. The whole mystery of Nature becomes an open book to you. You can live in the Eternal Light and Glory of God.
Page-2
योगेन चित्तस्य पदेन वाचा मल सरीरस्य च वेधकन
योपकरोतु प्रवर मुनीना पतंजलि प्रांजलिरानतोस्मि
I offer my salutations with folded hands to Pat Anjali, the renowned amongst the sages, who removed the impurity of mind by Yoga, of the speech by grammar and of the body by Ayurveda.
Page-3
धर्मार्थ -काम मोछाना आरोग्येमूलमूततमाम A Disease free life is the pre-requisite to achieve DHARMA, ARTHA, KAMA AND MOKSHA. That is why it is said- “Health is Wealth.”
To maintain good health, there are numerous modern physical cultures designed to develop the muscles. The physical culturist develops them by mechanical movements and exercises. In such physical exercises, there is a fast movement of muscles resulting in the rapid functioning of the heart and lungs. The practitioner becomes exhausted very quickly. There may be anxiety, psychological tension and fear. Some exercises develop chest and arms only ad thus result in lop-sided development of the personality.
In Yogic exercised, there is harmonious development of all the muscles of the body, internal organs nerves and the frame. There is no rapid movement and there is no waste of energy. Movements are gentle and rhythmic and thus significantly in conservation of energy.
The three important organs viz., heart, lungs and brain with its cerebrospinal system are kept in a healthy condition by regular practice of a few important Asanas and one or two breathing exercises.
These yogic exercises are both preventive and curative in their nature. On the whole, they prevent diseases attacking the body by maintaining the natural health.
Page-4
Important Instructions
Asana must be practised empty stomach in the morning or evening.
Three to four hours gap should be there between food and practice.
Use a folded blanket or Yoga mat.
Start with prayerful mood.
Avoid jerks, rapid movement and synchronise the movement with natural breath.
Trek suit or loose wear is convenient for practice.
Don’t wear spectacles or loose ornaments, watch etc. when you do Asanas. They may get damaged or may cause injuries.
Have no competitive spirit, keep your own limit and avoid stress and strain.
Asanas should be done in well ventilated room where there is free movement of fresh air. In cold region one can practice in the closed room.
The floor must be even. It can be practised in open airy places
Ladies should avoid the practice during pregnancy and menstruation.
If you get negative experience during practice, stop there and relax with normal breath.
Keep half an hour gap for bath ad food etc. after practice.
Regularity is most important factor if you want to derive the full benefits of the yoga Sana quickly.
Page-5
Energizing Techniques
It is very simple series. Thought it is simple, gentle and comfortable, it should nerve be ignored. It may be practised by any one: beginner or advance, young or elderly. It removes blockage which prevents free flow of energy in the body and mind. Due to wrong postures, disturbed bodily-functions, psychological or emotional problems blocked. This increases stiffness in body, muscular tension, lack of proper flow of blood etc. however, it the blockages become chronic, a limb, joint or physical organ may malfunction, become diseased.
Regular practice of this series removes energy blockages from the body.in this way, it promotes total health, regulating and stabilizing the flow of energy throughout the body.
Some people call it ‘Pawnaamuktasana Series’. The word Pawan means ‘wind’ or ‘Prana’, Mukta means ‘release’ and Asana means ‘pose’ Therefore Pawnaamuktasana Series means a group of Asanas that remove any blockage/blockages preventing the free flow of energy in the body and mind.
The first part (Anti-Rheumatic Series) touches all the joints and removes the stiffness, blockages of the whole body, as a result there is free flow of energy throughout the body. The body becomes supple and flexible.
The second part (Digestive/Abdominal Series) deals with the abdominal area.it removes the black ages of abdomen and promotes the function of digestive system. It is helpful to reduce waistline. It removes gas and constipation, it also invigorates the digestive fire.
Page-6
Energizing Techniques
This group of Asanas is concerned with loosening up the joints of the body. It is excellent for those with rheumatism, arthritis, high blood pressure, heart problems or other ailments where vigorous physical exercise is not advised. It is particularly useful for eliminating energy blockages in the joints and outer extremities of physical body; and it works on the Pranic and mental bodies as well.
Awareness
Practices may be performed I three ways: (I) with awareness of the actual physical movements; (ii) with awareness of integrated breathing. There should be breath synchronisation with physical movement. (iii) With awareness of the movement of Prana in the body. Prana may be experienced as a tingling sensation in the body which one become sensitised with practice.
Periodic rest
If you feel tired at any point during the Asana programme, rest and relax a while in Shavasana.
Practice Note
Greater benefit will accrue if Ujjayi Pranayama is used as a breathing technique. This effectively stimulates and balances the Pranic energy flowing through the Nadis.
STARTING POSITION
Sit with legs outstretched. Rest the palms on ground at back, keeping the arms straight. The back, neck and head should be straight. Sit comfortably. Close the eyes and relax the whole body in this position.
Page-7
TOES BENDING
Sit in base position as described above. Bring your awareness to the toes. Bend them slowly forward and backward. Hold each position for a few seconds. Repeat it 5 to 10 times.
ANKLE BENDING
Shift your awareness to the ankles. Slowly move them forward and backward bending them at the ankle joints. Repeat it 5 to 10 times.
ANKEL ROTATION
Separate the legs a little, keep them straight. Slowly rotate both the feet simultaneously clockwise 10 times and anticlockwise 10 times.
Join both the feet together, rotate simultaneously clockwise and anti-clockwise 5 to 10 times each side.
ANKLE CRANK
Bend the right knee and place the foot on the left thigh. Keep your ankle joint a little outside. Hold the toes with your left hand. Concentrate on the ankle joint and rotate clockwise and anticlockwise 5-10 times. Repeat the same process with your left ankle joint.
![]()
KNEE CAP CONTRACTION
Sit in base position. Contract the knee muscles around the knees drawing the knee caps towards the thighs. Hold the contraction 3 to 5 seconds. Release the contraction and let the knee caps return to their normal position. Practise it 5 times.
Page-8
KNEE BENDING
Bend the right knee, lock the fingers under the right thigh. Straighten the leg pulling up the knee cap with toes pointing forward. Do not allow the heel to touch the floor. Then, bend the right ankle with toes pointing upward and bend the right knee so that the thigh comes close to the chest and heel near the buttocks. Keep the head and spine straight. This is one round. Practise it 5 to 10 rounds. Repeat the same process with your left leg and then, do it with both the legs together. This is a strenuous practice and it should not be done by propel with weak abdominal muscles, back problem, high blood pressure, or heart problem.
KNEE CRANK
Sit in base position. Bend the right leg at the knee as described above in no’s. Place the hands under the right thigh and interlock the fingers or cross the arms holding the elbows. Raise the right foot from the ground. Rotate the lower leg at the knee in a large circular movement; try to straighten the leg at the top of the upward movement. The upper leg and trunk should be completely still. Repeat the same process with left leg. Rotate 5 to 10 times clockwise and anticlockwise. These Asanas rejuvenate the joints by activating the healing energy.
Page-9
HALF BUTTERFLY
Sit in the base position. Bend the right leg and place the right foot over the root of left thigh. Place the right hand on the right knee. Hold the right toe with left hand. Now breathing out, gently move the right knee up towards the Chest. Breathing gently push the knee down and try to touch the knee to the floor. The trunk should not move. Repeat it 5 to 10 times. Then change the leg and repeat the same with left leg.
HIP JOINT ROTATION
Remain in the starting position as in No 8. Now rotate the right knee in a circle trying to make the circular movement as large as possible. Practice it 5 to 10 times clockwise and anticlockwise. Release the right leg and repeat the same with left leg 5 to 10 times.
FULL BUTTERFLY
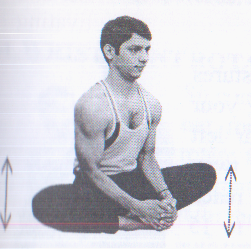
Sit in the base position. Bend the knees and bring the soles of the feet together. Bring the heels as near as possible towards buttocks. Clasp the feet with both hands clocking the fingers. Gently bounce the knees up and down. Try to touch the knees to the ground on downward stoke. Don’t use any force.
Page-10
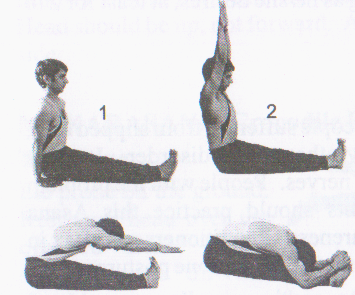
SPINAL MOVEMENT
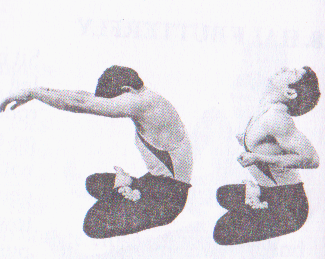
Sit Comfortably. Stretch your hands forward, palms facing upward. Exhale and hunch your back, down the head forward, chin stuck to the throat pit; feel the backward stretch of the spine. Inhale, clenching the fists; bring them to the sides of the chest; let the elbows go back. Drop down your head backward, feel the frontal stretch of the spine. Repeat it 5 to times.
11A. SPINAL MOVEMENT
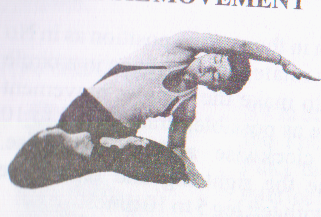
Sit Comfortably. Just bend towards your left. Rest your left. Rest your left forearm on the ground, palm facing downwards. Tilt your head to the left side. Now inhale and raise your right hand straight up. Exhale and just spread your right hand over the head. This is final position. Hold this posture with normal breath up to 15 counts. Keep your awareness on the spine. Feel the right side of your spine is more stretched. Then release and repeat on the other side.
11B. SPINAL MOVEMENT
Sit in Padmasana or any other sitting postures which is convenient to you. Now brings your right hand towards left knee. Take your left hand back. Keeping the spine straight, twist towards left while exhaling, when you reach the final position, hold the posture up to 15 counts with normal breath. Keep your awareness on the spine throughout. Then release and repeat on the other side.
Page-11
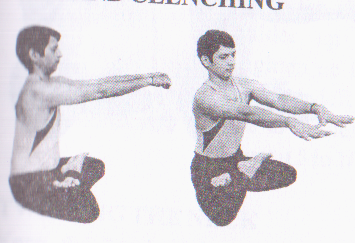
HAND CLENCHING
Sit comfortably. Spread out the hands in front of the body at shoulder front of the body at shoulder level. Exhale, open the hand, separating fingers maximum. Inhale; close the fingers to make a tight fist with thumb inside. Repeat it 5 to 10 times. Relax and feel the flow of Pranic energy in the fingers.
WRIST BENDING
Sit comfortably. Keep the hands out stretched in front at the shoulder’s level. Keep your palms facing down? Bend the wrists downwards, fingers pointing downwards with exhalation. Inhale and bend the wrists upwards fingers pointing upwards. Repeat it 5 to times.
WRIST JOINT ROTATION
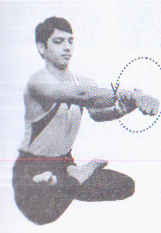
Sit comfortably. Keep the right hand stretched out, form the fist keeping thumb inside. Now rotate the wrist clockwise and anticlockwise alternately. Repeat it 5 to 10 times. Then repeat it for the other hand. This can be practised with both the hands stretched out simultaneously.
Page-12
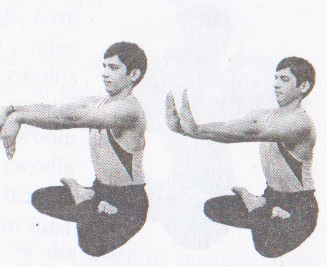
ELBOWS BENDING
Sit comfortably. Stretch out the hands in front, alms facing upward. Exhale, bend the elbows, bring the palms over the shoulders. Inhale, stretch out. Repeat it 5 to 10 times. Then spread the hands to the sides and repeat the exercise 5 to 10 times.
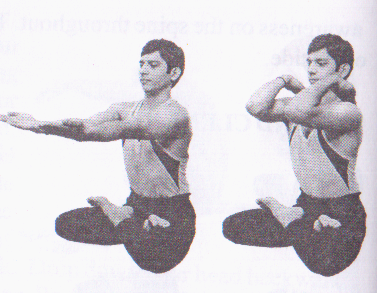
SHOULDER SOCKET ROTATION
Sit comfortably. Spread out the hands in front. Bend them at elbows and rest the palms over the shoulders. Join the elbows together. Inhale and move the elbows upward and exhale to bring the elbows down at the back to again join the elbows in front. This is one round. Repeat the round from front to back and back to front 5 to 10 times.
NECK MOVEMENTS FORWARD AND BACKWARD MOVEMENT
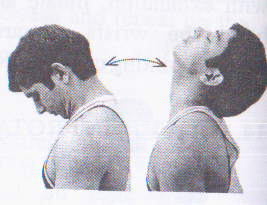
Sit comfortably with hands resting on the knees. Close your eyes. Slowly bend the head forward and try to touch the throat pit with the chin while inhaling. Don’t strain. Try to feel the stretch of the muscles in the front and back of the neck and the loosening of the vertebrae in the neck. Practise it 5 to 10 times.
Page-13
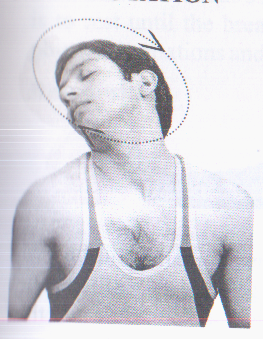
SIDE-TO SIDE MOVEMENT

Sit comfortably, keep the eyes closed. Bend the neck towards right; bring the right ear close to the right shoulder without lifting the shoulder up while exhaling. Inhale and straighten up the head then exhale and bend the head to left side and try to bring the left ear close to the left shoulder. This is one round. Repeat it 5 to 10 times on both sides.
TWISTINGTHE NECK
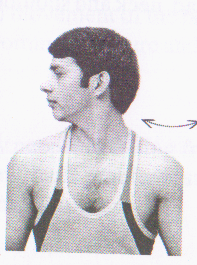
Keep the head upright and eyes closed. Now, gently turn the head to the right while exhaling so that the chin remains in line with the shoulder. Release and inhale to come back to the starting position. Exhale, repeat on the other side turning the face to left. This is one round. Repeat each round 5 to 10 times.
NECK ROTATION
Remain in the starting position with eyes closed. Slowly rotate the head in a circular manner to bring it down forward, to the right, backward, and then to the left side in a relaxed, smooth, rhythmic way. Feel the shifting stretch around the neck and the loosening up of the joints and muscles of the neck. Practice it 5 to 10 times clockwise and anticlockwise. Do not strain. Exhale, as the head is moved down forward and inhale as the head is moved backward.
Page-14
Limitations:
People with low blood pressure, high blood pressure, or extreme cervical spondylitis should not practice this.
Benefits:
All the nerves connecting the different organs and limbs of the body pass through the neck. Therefore, the muscles of the neck and shoulders accumulate tension, especially after prolonged work at a desk. These Asanas remove tension, heaviness and stiffness in the head, neck and shoulder region.
Page-15
ENERGIZIG TECHNIQUES
Part-ii (Digestive/Abdominal Series)
This group of Asanas is concerned specially with strengthening the digestive system. It is excellent for those persons suffering from indigestion, constipation, acidity, excess of mind or gas, lack of appetite, diabetes, disorders of the male or female reproductive systems and varicose veins. It also eliminates energy blockages in the abdominal area.
Awareness:
Throughout the practice be aware of the (a) movement of the body (b) breathing (c) mental count (d) intra-abdominal pressure and (e) the stretch of the muscles.
Limitations:
These practices should not be performed by people suffering from high blood pressure, serious heart condition, back problems such as sciatica, slipped disc, or soon after abdominal surgery.
Practice note:
Before practice, relax properly in Shavasana. Short rest should be taken after practice of each Asana by lying-in Shavasana. One minute or 30 seconds should be sufficient but more reliable advice is to rest until the breathing returns to normal. Be aware or the physical limitations and do not strain.
Base Position
All these Asanas are performed in the supine position that is lying flat on the back with legs together and straight. The arms should be by the sides, Palms facing down on the floor and head, neck and spine should be in a straight line.
Page-16
Practice-1
UTTANAPADASANA
(Raised Leg Pose)

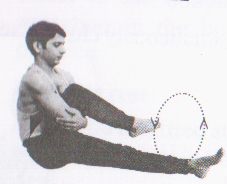
Lie down in the base position with the palms flat on the floor. Inhale and raise the right leg, straight up. Keep the legs straight, but the foot relaxed. Left leg should remain straight in contact with the floor. Hold the posture for 3 to 5 seconds, counting mentally and retain the breath. Exhale and slowly bring the leg down on the floor. This is one round. Practice it 5 rounds with each leg alternately. Then repeat the same process joining both the legs. Degree by degree, raise the legs and being back to the floor, keeping them straight.
Benefits:
It strengthens the abdominal muscles, digestive system, lower back, pelvic region and perineal muscles.
Practice-2:
CHAKRA PADASANA
(Leg rotation)

Lie in the base position. Raise the right leg 5 cms from the ground, keeping the knee straight. Rotate the leg clockwise 5 to 10 times in as large a circle as possible-clockwise and anti-clockwise. The heel should not touch the floor at any time during the rotation. Repeat with the left leg. Do not strain. Rest in the base position with abdominal breathing until the Respiration returns to normal. Now joining both legs, repeat it 5 to 10 times clockwise and anticlockwise.
Benefits:
It is good hip joints, it tunes the abdominal and spinal muscles; it removes obesity.
Page-17
Practice-3:
SUPTAPAWANAMUKTASANA
(Leg Lock Pose)
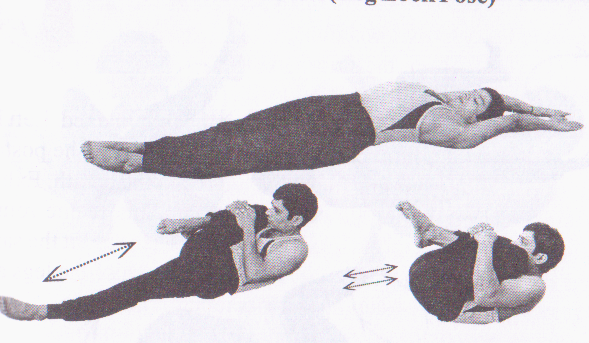
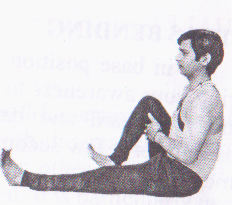
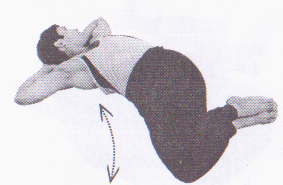
Lie in the base position. Bring the hands above the head, inhale and stretch the whole body. Bend the right knee and bring the thigh to the chest. Interlock the fingers and clasp the hands on the shin just below the right knee. Keep the left leg straight on the ground. Exhale and raise the head and shoulders up the ground and try to touch the right knee, with the nose holding the breath outside. Slowly inhale, release the leg and return to the starting position spreading the hands above the head. Now repeat the same process with the left leg. Repeat this 5 to 10 times. Then lock both the legs bet at knees. Repeat it 5 to 10 times.
Benefits:
It is effective in removing wind, gas and constipation. It gives massage to pelvic muscles and reproductive organs. It is useful in the treatment of impotence, sterility and menstrual problems.
Page-18
Practice-4:
PADASANCHALANASANA (Cycling)
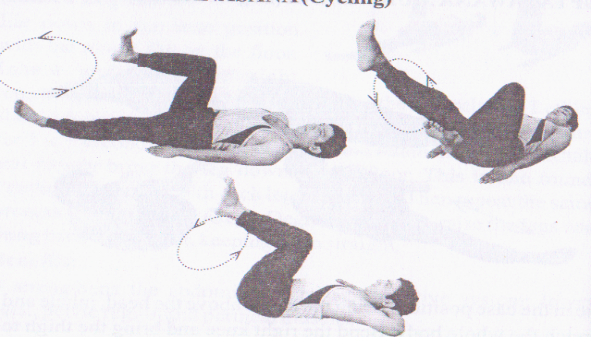
Lie in the base position. Raise the right leg. Bend the knee and bring the thigh to the chest. Raise and straighten the leg completely. Then, lower the straight leg in a forward movement. Bend the knee and bring it back to the chest to complete the cycling movement. The heel should not touch the floor during the movement. Repeat it 5 to 10 times in the forward direction, then 10 times in the reverse direction. Repeat the same process with the left leg. Then, join both the legs together and rotate. Afterwards practice alternate cycling movements as though peddling bicycle. Practice it 5 to 10 times forward and backward. Don’t strain.
Benefits:
This exercise is good for hip and knee joints; strengthens abdominal and lower back muscles.
Page-19
Practice-5:
ROCKING AND ROLLING
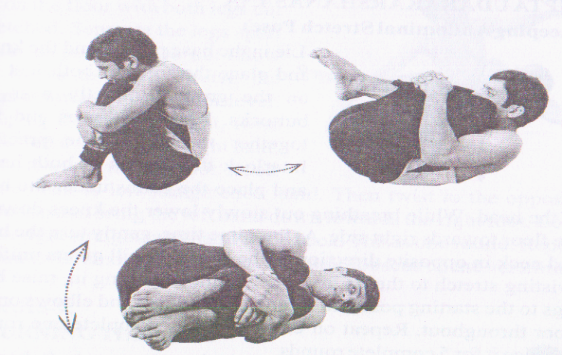
Lie flat on the back. Bend both legs at the knees and bring the knees to the chest. Interlock the fingers of both hands and clasp them around the shins just below the knees. This is the starting position. Roll the body from side to side 5 to 10 times, touching the side of the legs on the floor. Then hold the position on the back. Rock the whole body backward and forward on the spine. Try to come up into the squatting pose on the feet when rocking forward.
Benefits:
This Asana massages the back, buttocks and hips. It is most useful if it is done as the first thing in the morning, while getting up from bed.
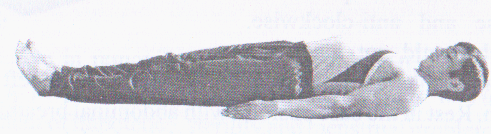
Page-20
Practice-6:
SUPTA UDARAKARSHANASANA
(Sleeping Abdominal Stretch Pose)
Lie in the base pose. Bend the knees and place the soles of both feet flat on the ground, directly near the buttocks. Keep the knees and feet together throughout the practice. Interlock the fingers of both hands and place the palms under the back of the head. While breathing out slowly lower the knees down to the floor towards right side. At the same time, gently turn the head and neck in opposite direction to the knees.it will give a uniform twisting stretch to the entire spine. While breathing in, raise both legs to the starting position. Keep the shoulders and elbows on the floor throughout. Repeat on left side to complete one round Practice it for 5 complete rounds.
Practice-7:
UNIVERSAL SPINAL TWIST
Take the base position. Spread your arms to the side at the shoulder level. Bend the right leg at the knee and rest the right foot on the left knee. Let the left hand rest over the right knee. Exhale, bring down the right knee towards left and turn the face towards right. Inhale and come to the starting positing. Change the legs. Bend the left leg at the knee and rest the left foot on the right knee. Let the right hand rest over the left knee. Exhale and bring down the left knee towards right and turn the face towards left. This is one round. Practice this exercise up to 5 rounds.
Page-21
Practice-8:
DYNAMIC SPINAL TWIST
Sit on the floor with both legs out stretched. Separate the legs apart as far as possible. Do not allow the knees to bend. Stretch the arms sideways at shoulder level. Keeping the arms straight, twist to the left and bring the right hand down towards the left foot. Look at the back to left straightened hand. Then twist to the opposite direction and bring the left hand down towards the right foot. Look at the right straightened hand at the back. This is one round. Repeat 5 round. It removes stiffness of the back, loosens up the vertebrae.
Practice-9:
CHURNING THE MILL
Sit with the legs outstretched. Join your feet together. Interlock the fingers of both hands and keep the arms outstretched in front of the chest. Keep the arms straight and horizontal throughout the practice; do not bend them at elbows. Bend forward as far as possible. Imagine the action of churning the mill with an old-fashioned stone grinder. Try to move the body at the waist, keeping the hands and legs straight. Exhale with forward movement and inhale with backward movement. Rotate clockwise and anti-clockwise 5 times each side. Then separate the legs as wide as possible, make it further dynamic and repeat the practice 5 times each side, clockwise and anticlockwise.
Page-22
Practice-10:
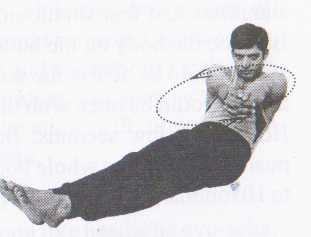
BOAT POSE
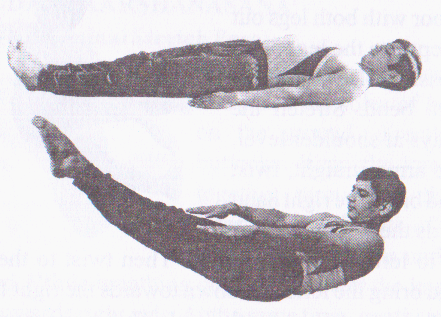
Lie in the base position. Keep your hands close to the side of the thighs palms facing down? Breathe in deeply. Hold the breath and raise the legs, Arms shoulders and head off the ground. The shoulders and feet should not be more than 1 fit. Above the floor. Balance the body on the buttocks and keep the spine straight. The arms should be held at the same level and in line with the toes. The hands should be open with the palms down, look towards the toes. Hold for a few seconds. Breathe out and return to the supine position. Relax the whole body. This is one round. Practice it for 5 to 10 rounds.
Page-23
Many people wear spectacles or contact lenses to improve their vision. Glasses however do not actually cure bad eyesight. In fact eye problems frequently get worse through their use, necessitating even more powerful lenses.
Factors, which contribute to bad eyesight are:-
Artificial and bad light.
Prolonged television or video watching.
Poor and imbalanced diet
Muscles inefficiency due to prolonged hours of office work and study.
Mental and emotional tension.
Toxic condition of the body and ageing.
In modern civilization, we observe that more and more children have started wearing spectacles. The duty of a doctor does not cease with an accurate prescription of lenses but a fact of paramount importance is that there should be proper guidance to the patient regarding ocular exercises and relaxation, a balanced diet, proper blinking, mental concentration and sport activities. Ophthalmic Yoga exercises and relaxation will improve the eyesight and also help to relieve eyestrain.
Ophthalmic Yoga helps in many ways:-
To get rid of the symptoms of eyestrain like headache eye-ache, heaviness, vertigo etc.
To improve the eyesight.
To prevent the further deterioration of eyesight.
To increase the strength of the ocular muscles and nerves, thereby helping in the maintenance of the proper shape of eyeballs
To increase the resistance of the tissues against the ocular infections by improving blood circulation.
To improve visual acuity which cannot be corrected by spectacles or contact lenses.
Page-24
Preparation:
Before starting the practice, it is a good idea to splash cold water into the eyes a few times. One can use eyewash cup for cleaning the eyes. Triphala water is more effective in t this case.
Practice notes: Eye exercise should be performed one after the other in the sequence given. It should be practised early in the morning or evening. Glasses should not be worn while performing the exercises.
The most important thing to remember during practice is to be totally relaxed. Don’t strain as that will lead to fatigue and tiredness of the eyes. The facial muscles, eyebrows and eyelids should remain totally relaxed. After each exercise, one should do blinking, palming (rubbing the palms and covering the eyes with them) and then do massaging. Lastly, with few gentle blinks, gently open the eyes and get ready for the next practice.
1st Practice:
Vertical movements
Sit comfortably, keeping back, neck and head in one straight line. Move the eyeballs upwards and downwards 5 times. Do blinking. Palming and massaging sequentially.
2nd Practice:
Horizontal movements
Sit in one of the meditative poses. The posture must be comfortable. Extend the hands to the sides at shoulder level; keep the hands straight, with the thumbs pointing upwards. Now move the eyeballs in the horizontal direction from one
Page-25
Extreme to the other, i.e. from right thumb to the left thumb and vice versa without winking. Repeat it 5 times. Then do blinking, palming and massaging sequentially.
3rd Practice:
Oblique movements
Sit comfortably with spine straight and upright. Now move the eyeballs in oblique directions. Start from right up, left down 5 times and then left up, right down 5 times. Now repeat blinking, palming, massaging sequentially.
Practice:-4
Rotational (circular) movement
Maintain the same sitting position as per previous practice. Keep the left hand on the left knee with Chin Mudra. Keep the right fist on the right knee keeping the right thumb up? Gaze at the tip of the right thumb. Now move the right thumb towards left, then upward in a circular way. Curve your gaze to the right and finally return to the starting position. This is one round. Do not blink or wink throughout the practice. Repeat 3 to 5 rounds clockwise. Then gaze at the left hand thumb and repeat the same anticlockwise 3 to 5 rounds. Repeat the practice the practice of blinking, palming and massaging. Avoid strain. Practice comfortably.
Page-26
TADASANA (base for all standing postures)

Stand straight chest raised up. Join your feet together. Keep your hands to the side of the thighs and palms resting to the side of the thighs close your eyes gently? Feel the weight of your body on the toes by swinging forward. Swing back and feel the weight on the heels. Swing to the sides and feel the weight at the right edge and left edge of your feet. Then balance your weight on the centre of the feet. Stand straight. Feel the lightness of your body. Have no other thought. Hear all the external sounds without resistance. Don’t think about the cause and nature of the sounds. Develop an attitude of a detached witness and hear all sounds. Feel the calmness of mind. Be one with nature.
Benefits:-
You will acquire lightness of the body and calmness of the mind.
Page-27
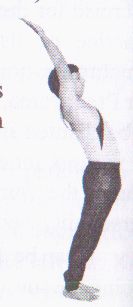
ARDHAKATI CHAKRASANA
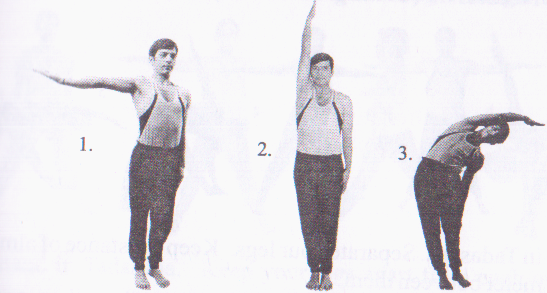
Stand in Tadasana. Slowly raise the right arm up to shoulder level to the side with partial inhalation. Keep your palms facing upward
With full inhalation, raise up the hand above the head & give upward stretch. Now right arm is almost in contact with the right ear.
Exhaling just bend towards left. Slide down the left hand along the left leg.
Hold with normal breath. Feel that the right side is more stretched and the left side is relaxed and compressed. Slowly come back to the base position step by step. Relax and repeat the same process on the other side. It is self-complimentary posture.
Duration:
Hold up to 5 to 10 breaths each side. Repeat 2 to 3 times.
Limitations:
Persons with severe back pain and lumbar problems should not practice this Asana.
Benefits:
It develops flexibility of the spine; loosens the hip joints; never allows fat to be accumulated at waist; cures backache, constipation. It is good for flat foot.
Check Points:
Don’t bend forward or backward. Don’t drop your head to the side and don’t bend your elbow, wrist and knee.
Page-28
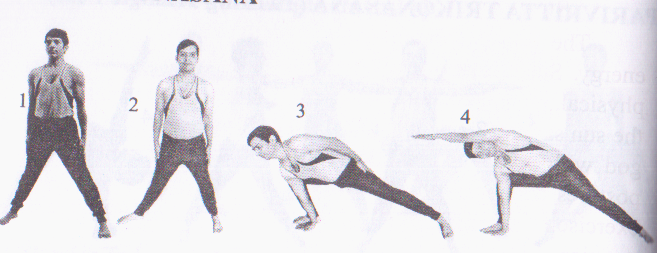
TRIKONASANA (Triangle Posture)
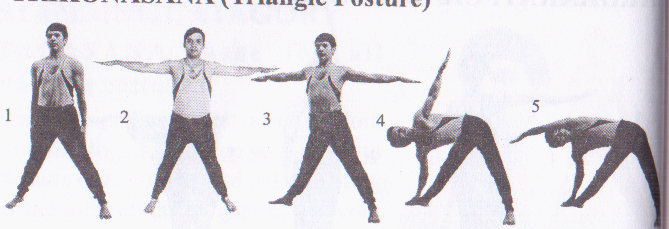
Stand Tadasana. Separate your legs. Keep a distance of almost 1 to 1½ meter between them.
Spread out your hands to the side up to shoulder level; keep them parallel to the ground, palms facing down.
Twist your right foot towards right side.
Exhale, bend the trunk towards right and rest right palm over the right foot or ankle,
Now, stretch the left hand over the head without bending; palm facing down. Hold with normal breath. Concentrate on the spine release step by step, come back to Tadasana. Repeat the same process on the other side. It is a self-complimentary posture.
Duration:
As per the previous Asana
Limitations:
People suffering from severe back pain, lumbar spondylosis, high blood pressure and heart problem should avoid this practice.
Benefits:
It removes the stiffness in legs, arms hips and corrects the minor deformities in legs, relieves backache and neck sprains, develops the chest, its practice makes the spine flexible.
Check Points:
Knees should not bend, body should not twist forward or back, head should not drop forward, and weight should not rest on any single leg.
Page-29
PAVIVRITTA TRIKONASANA (Twisting Triangle Pose)
Stand in Tadasana. Keep your legs apart from each other and take a medium distance.
Spread the hands to the sides at the shoulder’s level; keep them parallel to the ground, palms facing down.
Twist your trunk and take a right turn.
Bend forward and bring your left hand to the right foot. Look at the straight right hand turning the face upwards. Hold on with normal breath in the final position. Concentrate on your spine. Release and come back to the base position step by step. Rest and relax a while. Repeat the same process on the other side. It is a self-complimentary posture.
Duration
Hold up to 3-5 breaths, 2-3 times each side.
Limitations
Persons with heart problem, lumbago and cardiac disorder should avoid this practice.
Page-30
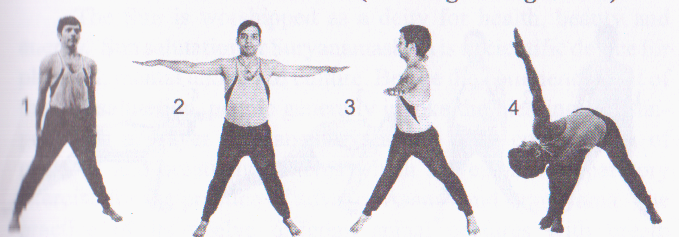
PARSVAKONASANA
Stand in Tadasana. Separate your right leg from the left leg and keep a distance of almost 1 to 1 ½ meter.
Turn the right foot towards the right side.
Bending at the right, keep the right thigh parallel to the ground. Let the right palm rest on the ground by the side of the foot. Now right side of the body is closer to the right thigh. 4. Raise the left hand and stretch it over the head along the left ear. Keep arms straight and look at the left palm. Hold with normal breath. Concentrate on Mooladhara Chakra. Next, step by step come back to the starting position. Repeat the same process to other side, it is left-complimentary.
Duration:
Hold up 2-5 breaths each side and repeat 2-3 times.
Limitations:
Persons with heart problem, severe back condition, high blood pressure and sciatica should not attempt this posture.
Benefits:
It strengthens calves, forearms, biceps, triceps, ankles, knees, Wrist and shoulder joints. It stretches and relaxes the thighs, expands chest, it is useful for diabetes and constipation.
Check Points:
While bending to the side, avoid forward bending. The weight of your body should not rest on your hand.
Page-31
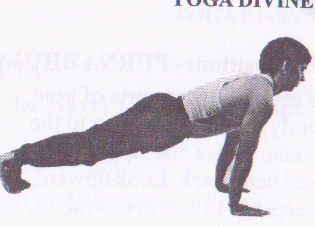
SURYA NAMASARA (SUN SALUTATION)
The Sun is worshipped as a deity for health, beauty and energy. Sun salutation or Suryanamaskara is scientific device for physical, mental and moral culture. Before the commencement of the sun salutation, people generally invoke the blessings of Sun-god with a prayer. Suryanamaskara is a wise combination of postures and breathing patterns which serves as a preparatory exercise for the practice of advance Asanas and Pranayama. The practice of its twelve different spinal posture with breath synchronization makes the body flexible and prepares the lungs for Pranayama. While performing the Suryanamaskara, Mantra is to be chanted along with each posture and the mind is to be focused in various inner centres according to the nature of the posture. Thus, the sun-salutation touches all the levels of human personality, viz: physical, vital, mental, intellectual and spiritual.
It can be done in the morning or evening with empty stomach facing the sun. It is a boon for them those who have a stiff body. It reduces unnecessary fat in the abdomen, opens the energy channels and allows free flow of energy throughout the body which is helpful to develop flexibility of the physical body.
Prayer to the Sun
Meaning: I always adore Surya, the sun, the beautiful Lord of the world, the immortal, the quintessence of the Vedanta, the auspicious, the absolute knowledge, of the form of Brahman, the lord of the gods, ever pure, the one true consciousness of the world itself, the lord of Indra, the gods and men, the preceptor of the gods, the crest jewel of the three worlds, the very heart of the forms of Brahma, Vishnu and Siva, the giver of light.
Page-32
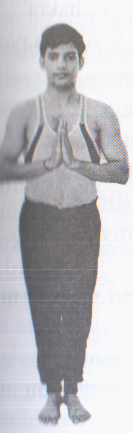
1st Position: - NAMASKARASANA
![]()
Stand straight joining the palms keeping them in front of the chest. Keep the thumbs touching the centre of the chest. Concentrate on the space between two eyebrows-Ajanachakra
Mantra-Om Mitraya Namah.
(Prostrations to Him who is affectionate to all)
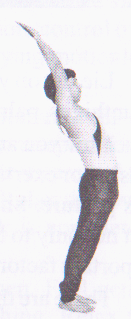
2nd Position: - HASTA UTTANASANA
Breathe in and simultaneously raise your hands above the head, bend back gently. Concentrate on the throat centre or Vishudhi Chakra.
Mantra- Om Ravaye Namah.
(Prostration to Him who is the cause for change)
3rd Position: - PADAHASTASANA
Exhale, bend forward keeping the legs straight. Keep the hands beside the feet on the ground. Try to bring your head to the knees if possible. Concentrate on the Naval Centre or Manipura Chakra.
Mantra-Om Suryaya Namah.
(Prostrations to Him who induces activity)
4th Position: - EKAPADA PRASARANASANA
Stretch your right leg long step back. Let your right knee rest on the ground. Breathe in. look to the front. Concentrate on the root of the spine or Svadhisthana Chakra.
Mantra-Om Bhanave Namah.
(Prostrations to Him who diffuses light)
Page-33
5th Position: - DIVIPADA PRASARANASANA
Stretch your left leg back. Left it join the right leg at the back. Retain the breath inside. Concentrate on the Heart Centre or Anahat Chakra. Keep the body straight like an inclined plan.
Mantra-Om Khagaya Namah.
(Prostration to Him who moves in the sky).
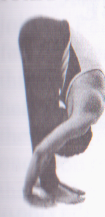
6th Position: - ASHTANGA NAMASKARASANA

Bring down your knees, chest and forehead/chin to rest on the ground keeping hips raised up slightly. Exhale and have normal breath. Be aware of the whole body.
Manta-Om Pushne Namah.
(Prostration to Him who nourishes all)
Variation for women only
SHASHANKASANA
(Crescent moon Posture)
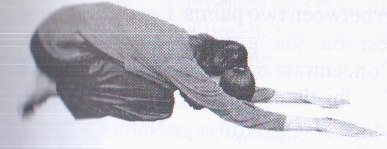
Let the knees rest on the ground. Swing back and bring the hips back over the heels. Rest your hands on the ground above the head. Forehead should rest on the ground. Exhale and have normal breath.
Page-34
7th Position: - PURNA BHUJANGASANA
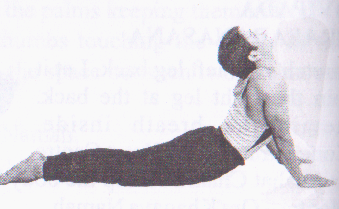
Keep the lower parts of your body on the ground up to the waist. Raise the upper parts and bend back. Look upward, keeping the arms straight. Breathe in. concentrate on the perineum or Mooladhara Chakra.
Mantra-Om Hiranyagarbhaya Namah.
(Prostration to Him who contains everything)
8th Position: -PARVATASANA (Mountain Pose)
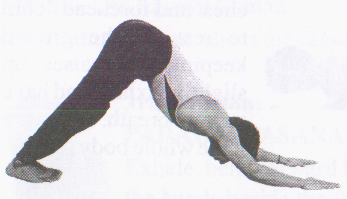
Exhale. Slowly raise up your hips. Let your soles and heels rest on the ground. Lower the head in between arms. Concentrate on the crown canter or Sahasrara chakra
Mantra-Om Marichaye Namah.
(Prostration to Him who possesses rays).
9th Position: - ASHVASANCHALANASANA
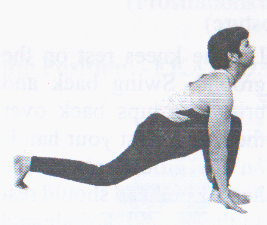
Inhale. Bring the right leg forward bending the knee. The right foot in between two palms. Let the left knee rest on the ground. Look upward. Concentrate on the root of the spine or Svadhishana Chakra.
Mantra-om Adityaya Namah.
(Prostration to Him who is the son of Aditi)
10th, 11th and 12th positions are similar to 3rd, 2nd and 1st position respectively.
Page-35
10th Position: - PADAHASTASANA
Concentrate on the Naval Center or Manipur Chakra.
Mantra-Om Savitre Namah.
(Prostration to Him who produces everything).
11th Position: - HASTAUTTANASANA
Concentrate on the throat center or Vishudhi Chakra.
Mantra-Om Arkaya Namah.
(Prostration to Him who is fit to be worshipped).
12th Position: - NAMASKARASANA
Concentrate on the space between two eyebrows or Ajna Chakra.
Mantra-Om Bhaskaraya Namah.
(Prostration to Him who is the cause of lustre).
Duration:
Repeat the practice at least 2 rounds to 12 rounds even more as per your capacity. Then lie flat on your back and relax the whole body and mind till the breath becomes normal. It is good to relax in Shavasana.
Remarks:
Some schools do not accept it as a traditional practice. So you may find some variations. But you should not be confused. Follow any one school, which is suitable to you.
Page-36
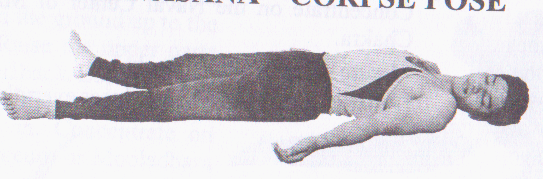
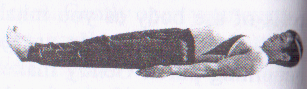
Lie flat on your back, keep your legs apart, hands by the side of your thighs, palms facing up. Close your eyes gently.
Now you are going to relax your entire body. Whatever stress, tension or exertion is in the body, is to be eliminated completely in this posture. Shavasana combines pose with meditation. It gives rest not only to the body but also to the mind. Relaxation is a very important factor in all muscular exercises.
There are three phases of relaxation. In the 1st phase, you have to rotate your awareness/consciousness in your body parts and you will have total physical relaxation. Then in the 2nd phase, you have to be aware of your natural breath to achieve mental relaxation. Unless or until you reach your spiritual being, which is full of bliss, you cannot have complete relaxation. In the 3rd phase, you will have to tune yourself with your spiritual being transcending the body, mind, and senses and thereby attain total happiness.
So bring your awareness to the toes and gently move them, relax them. Mentally disconnect yourself from that part of the body and give the auto-suggestion: let the toes go from my mind. Feel that all the toes are completely relaxed.
Become aware of the soles. Sensitise them and relax them. Then bring your awareness to the heels, feel the heavy weight of your legs is resting on them. Relieve them of the weight and relax them. Loosen your ankle joints and relax them. Slowly bring up your awareness to calf-muscles. Feel them and relax them. Feel that up the calf muscles both legs ae relaxed.
Page-37
Just pull up the Kneecaps; release and relax. Relax the Knee joints. Feel both legs up to knees are completely relaxed. Now feel the heavy muscles and bones of your thighs. Relax them. Feel that the heavy weight of your body is now resting on your hips, heavy bones and muscles. Relax the hips. Relax the waist. Up to the waist entire lower parts are completely relaxed. Make sure: once you relax any part you should not have any more control over that part of the body. Now entire lower parts are lying motionless on the ground as if there is no life in them.
Now, become aware of your vertebral column. Feel the entire weight of the body is resting on it. Relax the vertebral bones one by one up to the neck. All the muscles and nerves around the spine are totally relaxed. Feel the back muscles. Relax the lower back, middle back and upper back. Entire back is completely relaxed.
Gently shift your awareness to the abdomen. Feel gentle movement of the abdomen due to natural breathing. Relax the abdominal muscles. Just be aware of the organs of the abdomen; kidneys, intestines, spleen, pancreas, liver and stomach. All the organs are relaxed completely. Slowly bring your awareness up again towards chest. Feel the entire weight of the chest is resting on the ribs. Relax the ribs. Relax the chest muscles. Feel the heartbeat, also feel the harmonious movement of the lungs with natural breath. Relax them. Feel the lightness of the chest region due to complete relaxation. Now feel the heavy weight of body is resting on the back of the shoulders. Relax the shoulders, shoulder blades are relaxed. The wave of relaxation is now moving towards hands. Relax the arms armpits, biceps, triceps, and elbows. Relax the lower arms, wrists, palms and fingers. Both hands are relaxed completely.
Gently shift your awareness to the neck. The entire weight of your head is resting on it. Slowly move your head from side to side and then keep it comfortably. Relax the neck. Relax the chin. Slightly separate the lips and relax them. Have a gentle gap between the two rows of teeth and relax them. Just loosen your tongue and relax it. Have gentle smile and relax the cheeks. Feel
Page-38
The natural breath through both nostrils. Relax them. Bring your awareness to the region of your eyes. Gently open your eyes and partially look at the ceiling. Then gently close your eyes. Relax the eyeballs. Relax the eyelids. Eyebrows are relaxed. Entire region of the eyes is relaxed completely. Now concentrate on the space between two eyebrows. Relax the forehead. Have no more thoughts. Concentrate on the ears and hear all external sounds without resistance. Don’t think of the nature and cause of the sounds. Relax the ears. Finally the skull and brain are completely relaxed. Your entire body from tip of the toes to top of the crown is completely relaxed now. Entire weight of the body is now resting on the earth plane. Have complete physical relaxation.
Now becomes aware of the natural breath. Let it be normal and natural without effort. Relax the diaphragm. Feel the movement of breath, length of breath, temperature of breath. Feel the volume and density; also feel the spontaneous sound of the breath. Keep on the total natural breath awareness. If the awareness can be kept on natural breath, then within few moments mind will be calm.
With every breath feel that your body is becoming lighter and lighter. Ultimately it becomes so light that it starts floating like a piece of cotton. Just like other bodies-sun, moon, stars, your body is floating in the space, in the ether. Now there is no more stress, strain, discomfort, and uneasiness. Now there is nothing negative. There is peace, joy, serenity and bliss.
Finally tune yourself with the spiritual being which is full of bliss by entering into deep silence. Happiness comes when individual merges in god. Remain in this state. This is your real state. The Atmic state.
Slowly become aware of the natural breath again. With every incoming breath, feel the Pranic energy from whole cosmos entering and rejuvenating all parts of the body and with every outgoing breath feel all the impurities are going out of the body.
Page-39
Feel the fresh oxygen is entering and rejuvenating the blood cells of the body as you inhale and as you exhale all negative, devilish qualities, toxin are going out. Gradually your body is becoming purer. Gently make your mind extrovert and become aware of the situation around you. Once again bring back your awareness to toes, fingers, and head, gently move them. Become aware of the whole physical body. Bring your legs together. Stretch your hands above the head. Take a deep breath. Stretch the entire body; turn your body to right and then return to your back again. Repeat towards left. Take the help of your hands to get up. Come to any sitting posture. Hari Om Tat Sat. Here the practice of Shavasana is over.
Benefits:
This Asana relaxes the whole psycho-physiological system. It should ideally be practised before sleep; before, during and after the practice of Asanas, particularly after dynamic exercises such as Suryanamaskara; and when the practitioner feels physically and mentally tired. It develops physical awareness. When the body is relaxed, awareness of the mind increases. It develops Pratyahara.
Practice note:
Try not to move the body at all during the practice as even the slightest movement may create muscular contraction. A mantra of one’s choice may be repeated with every inhalation and exhalation. For the maximum benefit, this technique should be performed after a hard day’s work or just before sleep. It is good for the person with problems of heart, hypertension etc.
Page-40
Base pose
Lie flat on your back. Keep your legs together. Keep your hands close to the body, palms facing downward.
SARVANGASANA-(All members’ pose)
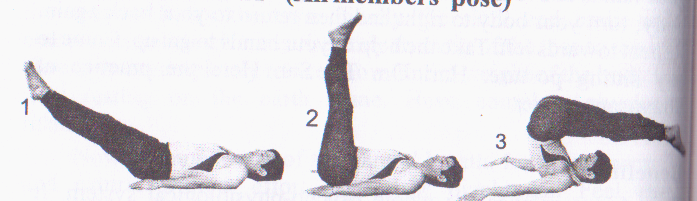
Raise both legs up to 45 degree from the ground.
Slowly raise them up to 90 degree.
Lift the buttocks and trunk off the ground, supporting your back with the hands and keep your legs parallel to the ground above the head.
Now, straighten the whole body, legs perpendicular to the ground. When you come to the final position, press the chin against your throat pit.
Duration:-
Hold the posture with normal breath. Concentrate on the throat center. In the beginning, hold comfortably for few seconds. Gradually increase the time of holding. After a few days of practice, hold up to 3-5 minutes.
Limitations:
The people suffering from hypertension, cervical and lumbar spondylitis, heart problems, severe constipation should not practice this Asana.
Page-41
Benefits:
It keeps the thyroid and para-thyroid glands healthy and as a result promotes metabolism. It removes the problems of dyspepsia, constipation, and menstrual disorders. It is useful in treating varicose veins, piles and hernia; improves memory power and power of concentration.
Checkpoints:
Keep legs and feet together. Don’t bend the legs at knees. Don’t lean to any side. Don’t bend your hips backwards. Keep your elbows close to the body.
MATSYASANA (Fish Pose)
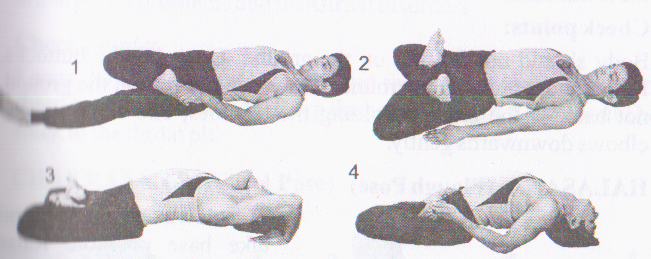
Lie down on your back in base pose. Bend the right leg at knee and keep the right foot on the left thigh.
Bend the left leg at knee and place the left foot on the right thigh.
With the help of your elbows lift the back, arch the back maximum and rest the crown of your head on the ground.
Hold the big toes with your index finger making them hooks.
Alternative practice:
If it is difficult to do, then do simple fish Pose Keeping the legs straight on the ground, arch up the back and rest the crown of your head on the ground. Breathe normally. Concentrate on the crown/throat/root of the spine.
Page-42
Duration:
Hold at least for one third of the time of Sarvangasana i.e. 1-2 minutes.
Limitations:
People with heart problem, peptic ulcer, hernia, severe back condition and pregnant woman should not attempt this practice.
Benefits:
As it is complimentary to Sarvangasana, it enhances all its benefits. It refreshes after heavy deskwork. It is good for diabetes, asthma, cold, cough etc. pituitary and pineal glands, located in the brain are stimulated and toned. It regulates moods, emotions and stress. It practised with cross-legged pose, it prevents loss of Prana through the lower limbs.
Check points:
Body should not fall flat on the ground. Don’t lift the buttocks. Knees should touch the grounds. Crown should rest on the grounds, not back of the crown. Holding the big toes, one can end the elbows downwards gently.
HALASANA: (Plough Pose)
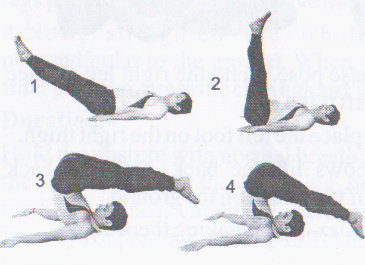
Like down on your back and take base position. Raise both legs up to 45 degree with partial inhalation.
Raise them again up to 90 degree with full inhalation.
Lift the buttocks up from the ground; keep your legs parallel to the ground above the head. Exhale.
Now come to the final position. Let the toes rest on the ground above the head. Keep your hands straight, palms facing down. You can also stretch the hands over the head and rest them on the ground. Hold comfortably with normal breath. Concentrate on the navel center.
Page-43
Duration:
Hold comfortably up to 5 to 15 breaths
Limitations:
People suffering from B.P, spondylitis, chronic constipation, sciatica and slipped disc should avoid this practice.
Benefits:
It stretches and tones the back and the neck, so the nerves get rejuvenated. It is effective for thyroid and adrenal glands. It improves the operation of sympathetic nervous system; increases blood circulation in the whole area. It is good for curing dyspepsia and constipation. It activates, warms up and lightens the psychophysiological system. It is also useful for asthma, bronchitis, urinary tract problems and menstrual disorders.
Check points:
Keeps the legs straight, do not bend them at the knees, buttocks should not lean to the side. Keep the hands straight. Chin should be stuck to the throat pit.
CHAKRASANA (Wheel Pose)
Lie down on your back and take base position. Bend the legs at the knees and keep your heels just near the buttocks. Have little gap between the feet.
Stretch the hands over the head, bend them at elbows, palms should rest beside the neck, fingers pointing towards the body.
Lift the buttocks from the ground.
Page-44
Straighten the arms, lifting the head and shoulders, let your head hang in between arms. Give upward push at the back. Concentrate on the spine and Manipur Chakra.
Duration:
Hold comfortably up to 5 to 15 breaths.
Limitations:
The people suffering from hypertension, heart ailment, weak wrists and arms and the ladies in carrying stage should not attempt this posture.
Benefits:
It is beneficial for the nervous, digestive, respiratory, cardiovascular and glandular systems. It influences all the hormonal secretions and relieves various gynaecological disorders. It clears the respiratory track. A feeling of lightness and freshness is evolved.
Check points:
Arch the body to maximum. Don’t raise the heels off the ground. Don’t strain and struggle to come to the final position. Keep your face and shoulders relaxed.
Page-45
Base pose
Lie prone on the abdomen. Legs and toes joined together, pointing back. Hands stretched over the head, palms facing down and forehead on the ground.
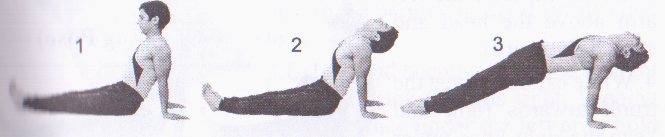
BHUJANGASANA (Cobra Pose)

Bend the elbows and rest the palms under the shoulders, fingers pointing forward. Keep the elbows close to the body.
Inhale and raise the upper part vertebrae by vertebrae. There should be no pressure on hands. Feel a gentle pressure on the lower abdomen. Exhale and come down to the ground.
Duration:
Hold with normal breath up to 10 to 15 breaths. Concentrate on the lower abdomen or root of the spine. Repeat 2 to 3 times.
Variations:
Remove the hands from the ground. Bring them back and lock your fingers. Then raise the head and upper part of the body and bend back. Look up. With exhalation bring down the trunk and head. Concentrate on Swadhisthana Chakra or root of the spine.
Limitation:
People with problems of peptic ulcer, hernia, intestinal tuberculosis or hyperthyroidism should not practice this Asana.
Page-46
Benefits:
It is good for slipped disc, sciatica, and backache. It keeps the spine supple and healthy. It tones the ovaries and uterus and helps to cure menstrual and other gynaecological disorders. It is beneficial for all abdominal organs.
Check Points:
No pressure should come on the palms. Trunk, upper arms and elbow should be kept intact. Don’t drop the head forward, don’t hunch the shoulders, don’t lift the abdomen, also don’t straighten the arms. Keep the legs together.
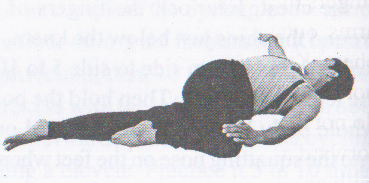
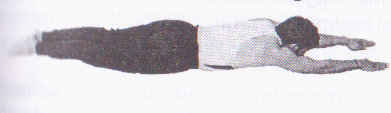
SALABHASANA (Locust Pose)
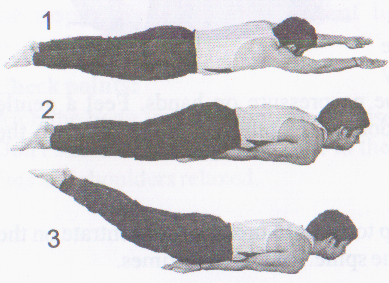
Lie prone on your abdomen and take the base position. Keep your legs together, toes pointing back
Keep your hands underneath the thighs; do not bend the elbows and keep them straight.
Rest your chin on the ground. Inhale and stiffen the back muscles and lift the legs together without bending them at the knees. Hold the breath inside for few seconds with awareness on upper back muscles above the waist. Exhale, release the posture.
Duration:
Hold for few seconds only and repeat it for 2 to 3 times.
Limitations:
People with weak heart, high blood pressure, peptic ulcer, hernia and intestinal tuberculosis should avoid the practice.
Page-47
Benefits:
It stimulates the parasympathetic outflow; strengthens the pelvic and lower back region. It is helpful to cure the problems of sciatica, slipped disc, and severe backache. It tones and balances the functions of liver and other abdominal organs. It stimulates the appetite. It reduces unnecessary fat at the chest region.
Check points:
Chin should not be lifted up from the ground; legs should not bend at the knees. Don’t keep the nose or forehead on the ground. Don’t separate the legs.
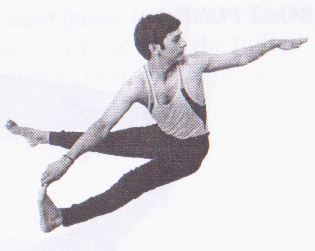
DHANURASANA (Bow Pose)
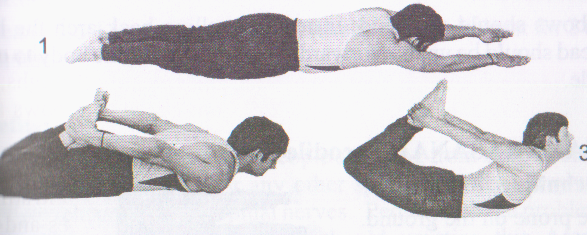
Lie prone on the ground and take the base position.
Bend the legs at knees. Bringing the hands back, hold the right ankle with right hand and the left with left hand.
Separate the knees with a little gap between them. With inhalation, now raise the knees thighs, chest, and head; pull the legs and arch the back maximum and look up.
Duration:
Hold with normal breath in the final position. Feel, the entire weight of the body is resting on the abdomen. Hold up to 3 to 5 breaths at least. Concentrate on the Manipur Chakra. Release with exhalation and repeat it 2-3 times.
Page-48
Limitations:
People with problems of weak heart, high blood pressure, hernia, colitis, peptic and duodenal ulcer should not practice this asana.
Benefits:
The liver, abdominal organs and muscles are massaged. Pancreas and adrenal glands are toned. It balances their secretions. It removes dyspepsia, chronic constipation and sluggishness of liver. It is useful in Yoga therapy for the management of diabetes, colitis, menstrual disorders and cervical spondylitis. The spinal column is realigned and the ligaments, muscles and nerves are given a good stretch, removing stiffness. It helps to correct hunching or the thoracic area of the spine.
Check Points:
Elbows should not bend. Instead of pulling back arch the back, Head should be up, not forward. Also don’t twist the body to either side.
MAKARASANA (Crocodile Pose)
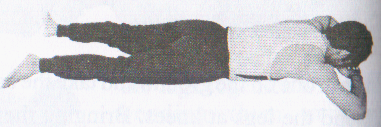
Lie prone on the ground. Rest your head over the crossed arms. Palms should rest on the shoulders or elbows, either of the two in which you feel comfortable. Gently separate your legs, toes pointing outwards and heels towards the center. Loosen all the joints and muscles. Relax the whole body and mind till the breath becomes normal.
Page-49
Variation:
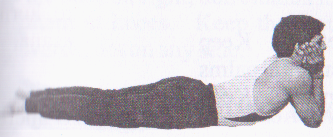
Raise the head and shoulders and rest the chin in the palms of the hands with the elbows on the floor. Keep the elbows together for a more pronounced arch to the spine. You may separate your elbows as per your convenience to relieve excess pressure on the neck. Here, in this Makarasana, the effect is felt at two points: the neck and the lower back. Relax all the joints, muscles, nerves etc. free your mind of all thoughts. Keep awareness of your natural breath.
Duration:
One can hold this posture as long as he/she desires, at least for 2 to 5 minutes.
This Asana is very effective for people suffering from slipped disc, sciatica, lower back pain or any other spinal disorder. It gives complete relaxation to the spinal nerves. People with the problem of asthma or any lung ailments should practice this Asana regularly with natural breath awareness. Practitioners can relax in this pose after or in between the practice of all prone postures.
Page-50
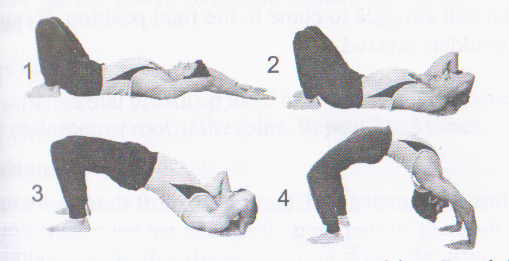
Base pose
Sit straight with legs out-stretched. Keep your heels and toes together with palms just near the buttocks on the ground. Keep your body steady and straight.
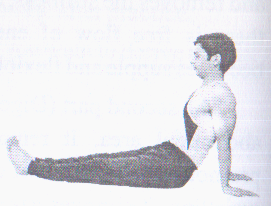
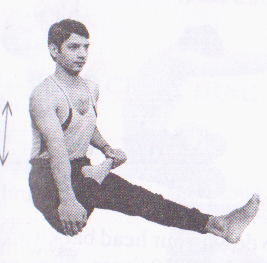
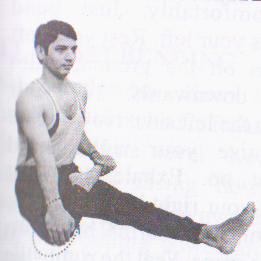
PASCHIMOTTANASANA (Back Stretching Pose)
Sit in the base position
Inhale and stretch both hands above the head, biceps coming close to the ears.
With exhalation, bend forward from the tailbone and keep hands parallel to the ground above the legs.
Hold the big toes forming hooks with index fingers or hold the ankles; shrink abdominal muscles inside and bring your head to the knees.
Duration:
In the beginning, hold for a few seconds. Experts with Uddiyan Bandha can hold this posture with normal breath. Feel maximum stretch of the spine and muscles.
Limitations:
People with the problems of sciatica, slipped disc and severe backache should avoid the practice.
Benefits:
It stretches the spinal nerves and muscles and causes free circulation of blood and energy. It keeps the spine healthy and elastic. It is useful in Yoga therapy for the management of menstrual disorder, sluggishness of liver, diabetes, kidney problems, bronchitis and eosinophilia.
Page-51
Check Points:
Keep the back straight, don’t hunch it. Keep the legs straight, don’t bend them at knees. Keep the feet together. Bend the elbows downwards, not on any side.
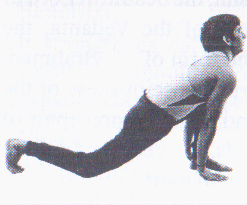
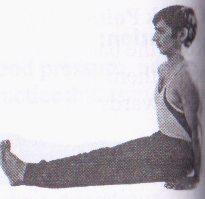
INCLINED PLAE (KONASANA)
Sit in the base position. Rest the palms on the floor at the back and keep the arms straight. Keep the fingers pointing backward.
Drop the head back and bring the shoulder blades closer.
Lift the hips up as high as possible; try to bring the feet flat on the floor. Keep the feet together. Keep the knees straight. Soles of the feet should rest on the ground.
Duration:
Hold for a few seconds, then release and relax in sitting position.
Limitations:
People with weak wrists and arms should avoid this practice.
Benefits:
It enhances the benefits of Paschimottanasana as it is the counter pose for it. It gives frontal stretch to the body and spine. It strengthens the arms. It causes free flow of energy in legs and hands.
Check Points:
Hang the head downwards; don’t raise it upwards. Keep the legs straight without bending them at knees. Both soles and heels should rest on the ground.
Page-52
VAKRASANA (Twisting Posture)
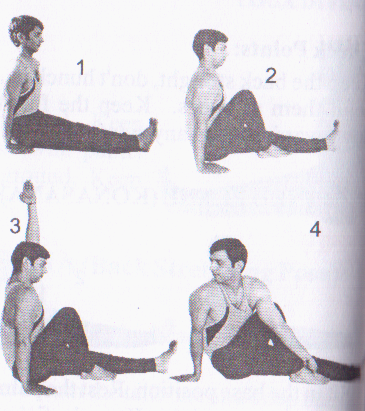
Sit in the base pose.
Bend the right leg at the knee and place the right foot just near the left knee.
Inhale and raise the left arm above the head and stretch it upwards.
While exhaling twist the trunk towards right and keep the right knee under left arm and hold the right foot with left hand. Keep the right hand little back. Turn the face towards right. Hold the posture with normal breath. Concentrate on the spine.
Duration:
Hold for 5 to 10 breaths. Release and relax. Repeat the same process on the other side. It is self-complimentary.
Limitations:
People with severe back pain and sciatica problems or with the problem of hernia, should avoid the practice.
Benefits:
It gives massage to the adrenal glands, kidneys and intestines, removes constipation. It corrects and eliminates sciatica problem in the beginning stage. It influences digestive system; reduces unnecessary fat accumulation around the waist.
Cheek Points:
The leg, kept straight, should not bend at the knee. Don’t hunch the back; keeping the spine upright, give maximum twist.
Page-53
ARDHA MATSYENDRASANA (Half Spinal-Twist Pose)
Sit in the base position keeping the legs out-stretched. Bend the right leg at the knee and just cross over the left leg. Place the right foot just near the left knee.
Bend the left knee and bring the left heel to the perineum. Let it firmly stick to it.
Exhale and keeping the spine straight twist the trunk towards right; keeping the right knee under the left arm, hold right foot with left hand.
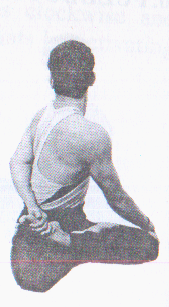
Take the right hand back to the left side of the waist. Turn your face to the right, twisting the neck above the right shoulder.
Duration:
Hold with normal breath for 5 to 10 times. Concentrate on the spine. Release and repeat the same process on the other side. It is self-complimentary.
Limitations:
Pregnant women should avoid this practice. People suffering from peptic ulcer, hernia, hyperthyroidism can practice it under the supervision of an expert.
Benefits:
It makes the spine supple; reduces unnecessary fat from the abdomen; tones the abdominal organs. It is beneficial for mild case of slipped disc and sciatica. It regulates the secretion of adrenaline and bile and is recommended in the yogic management of diabetes. Also, it is useful for yogic management of sinusitis, bronchitis, constipation, colitis, menstrual disorder, urinary tract disorders and cervical spondylitis. It can be performed without any discomfort.
Check points:
Buttocks should not be raised up from the ground. Body should not lean to either side. Shoulders should not drop. Keep the spine straight while twisting.
Page-54
USHTRASANA (Camel Pose)
1 .Sit in the base position. Bend the right leg at knee and keep the right sole under the right buttock. Bend the left leg at knee and keep the left sole under the left buttock and adopt Vajrasana.
2. Stand on the knees and support the back with the hands ben the elbows.
3. Bend gently backward and rest your right palm on right heel left palm on the left heel. Hang your head back downward and your hip forward.
Duration: Hold comfortably with normal breathing at least up to 10 breaths. Concentrate on the spine.
Limitations: Persons with heart ailment and hernia should avoid this practice.
Benefits: It develops flexibility of the spine and makes blood flow to freely; tones up abdominal viscera and stretches ribs. It is u for yogic management of backache, breathing problems, art lumbago, and sciatica. It removes indolence, makes practitioner active and alert.
Check Points:
Keep the thighs up to waist straight. Keep the knees together case you feel it difficult, have a little gap between the knees. The arms straight. Don't raise the head upward; let it backward.
Page-55
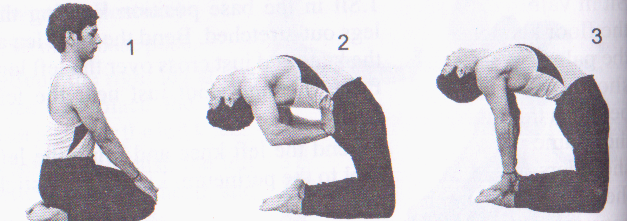
MARJARASANA
Sit in Vajrasana, rest your palms on the floor keeping distance between the palms same as that between the shoulders. Keep the distance between the palms and knees about the same as that between the shoulders. And the hip or equal to the length of the torso. The distance between the knees should be similar to the width of the waist. Relax the muscles in the trunk region and let them go down under the force of gravity. At the same time let the neck and head curve backward as far as possible. This is first part. Now for attaining final Marjarasana curve the back so that it shapes like an arch. Relax the neck and hang the head down. This is the final part of Marjarasana. Repeat both with normal breath integration.
Duration:
Practice of this I and II together make one round. Daily practise 5 to rounds.
Limitation:
Person with acute pain in the knees should avoid this posture.
Benefits:
The spine becomes flexible. It relieves the backache and neck ache resulting from over work. It tones up the back and neck muscles, helps in overcoming lethargy and makes the mind fresh.
Check point:
Thighs and arms should be perpendicular to the ground. Maintain the distance mentioned above.
Page-56
TRIPADA MARJARASANA
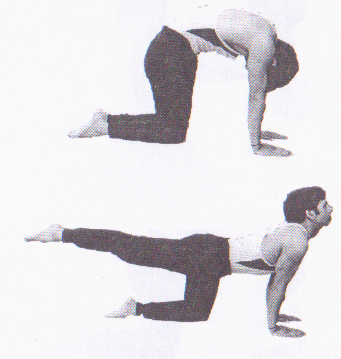
Assume the final position Marjarasana; straighten the back. Bring the right leg and head at the level of the back. Slowly curve the trunk so that the back becomes concave. This is the final position of Tripada Marjrasana. The same procedure may be alternately repeated with the left leg.
Duration:
Practise this 5 to 10 rounds with normal breath integration.
Limitation:
As per Marjarasana
Benefits:
The spine becomes flexible and healthy. It improves the health the organs in the torso. It relieves backache and neck ache. It is good for lumbar and cervical problems.
Check points:
Do not raise the leg too high; maintain the symmetry above the waist.
Page-57
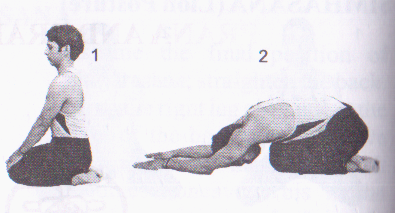
SIMHASANA (Lion Posture)
Sit in Vajrasana. Keep the knees apart. If possible (it is better to) face the sun.
Place the palms of your hands on the floor between the knees, fingers pointing towards the feet. Lean forward resting the body on the st raight arms. Arch the back and gently tilt your head back; feel the gentle stretch at the back.
Keep the eyes open and gaze at the space between two eyebrows; adoptSambhavi Mudra. Relax the whole body; inhale slowly and deeply through nose. Then open the mouth and extend the tongue towards the chin. Now exhale producing a clear steady (aah) sound from the throat. Close the mouth and breathe in. This is one round.
Duration:
Repeat this practice for at least 5 rounds.
Imitations:
In case of severe knee pain, don't do Vajrasana. Avoid practice during severe throat pain.
Benefits:
It is excellent to alleviate the diseases of throat, nose, ears, eyes and mouth. It releases the tension from the chest and diaphragm. It is useful for people who stutter or who are nervous and introvert. It develops a strong and beautiful voice.
Check Points:
Don’t bend the arms at elbows. Fingers should be spread inside towards the feet, not to the sides or forward. Don't straighten up the head, gently tilt it backward. Tongue extends downwards and not to the front.
Page-58
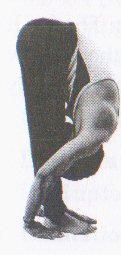
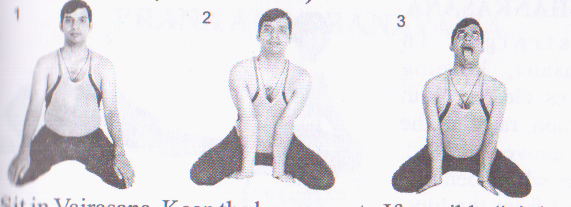
SHASHANKASANA
Sit straight in Vajarasana, keeping the eyes closed. With inhalation, raise up the hands above the head. Exhale while bending forward from the hips, keeping the arms, palms and forehead resting on the ground. Keep the arms loose and rest the elbows on the ground. Hold for a few seconds with exhalation and with inhalation raise up the arms trunk and come to the starting stage. Repeat it 3 to 4 times.
Limitations:
People with high blood pressure, slipped disc, lumbar problem and vertigo should avoid the practice.
Benefits:
It is helpful to tone up pelvis. It is useful to correct the male female reproductive organs. If done regularly, it removes problems of constipation. If it is practised with Ujjayi prayanama in final position, it cools the brain and eliminates anger.
Variation:
Forming the fists, place them in front of the lower abdomen; exhalation come to the final position. It gives better massage t internal organs of the abdomen and thus corrects the digestive system.
Check Points:
Don't lift the hips from the heels. Keep the forehead and not crown on the ground. Lower the arms up to elbows to rest on the ground.
Page-59
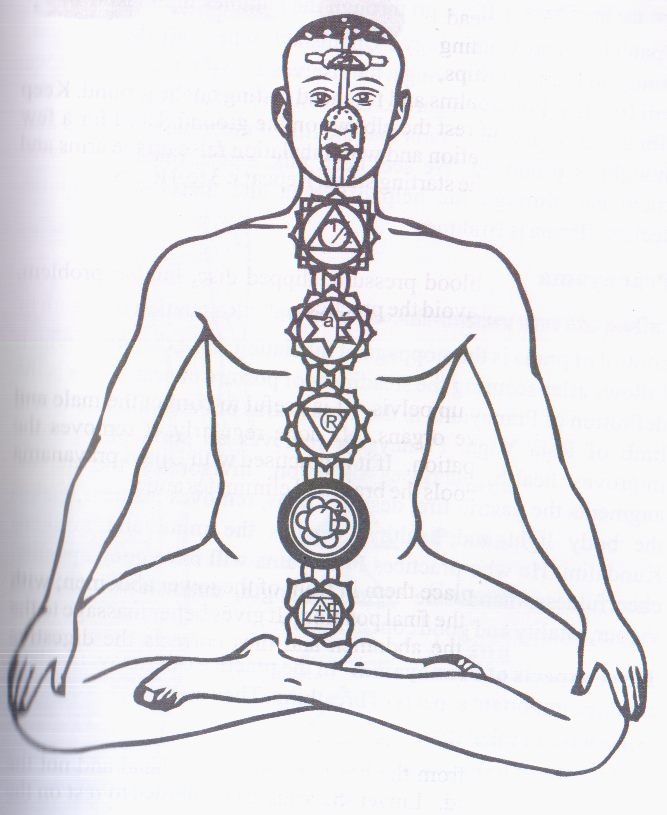
IDA, PINGLA, SUSHUMA AND SHAT-CHAKRAS
Page-60
Prana is vital force. It is all pervading. Although closely related to the air we breathe, it is more subtle than air or oxygen. "He who knows Prana knows Vedas" is the important declaration of Srutis. Vedanta Sutras say, "For the same reason, breath is Brahman”. If we go through the parables in the Kaushitaki Upanishad and Chhandogya Upanishad, where all the Indriyas, mind and Prana fight amongst themselves as to their superiority, we will find that Prana is regarded as the highest of all. It is through the vibrations of psychic Prana that the life of the mind is kept up and thought is produced. We see, hear, talk, sense, think, feel, will, know etc. through the help of Prana and therefore scriptures declare: 'Prana is Brahman'.
Pranayama
"Regulation of breath or control of prana is the stoppage of inhalation and exhalation, which follows after securing the steadiness of posture or seat." This is the definition of Pranayama in the Yoga Sutras of Patanjali. It is fourth limb of Raja Yoga. Pranayama removes all sorts of diseases improves health, energises digestion, invigorates the nerves, augments the gastric fire, destroys rajas, removes laziness, makes the body light and healthy, steadies the mind and awakens Kundalini. He who practices Pranayama will have good appetite, cheerfulness, handsome figure, strength, enthusiasm, courage vigour, vitality and good concentration.
Three aspects of Pranayama: - In the practice of Pranayama there are three important aspects of breathing. They are:
(a)Pooraka or inhalation
(b)Rechaka or Exhalation
(c)Kumbhaka or Retention which is again subdivided into two:
( i)Anta Kumbhaka and (ii) Bahir Kumbhaka.
Page-61
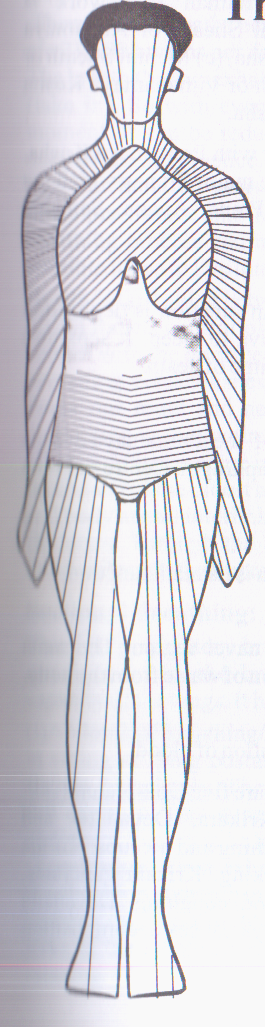
The Pranic Body
Page-62
According to Yogic physiology, the human framework is comprised of five sheaths: (a) Physical Sheath or Annama Kosha, (b) Vital sheath or Pranamaya Kosha, (c) Mental Sheath Manomaya Kosha, (d) Intellectual Sheath or Vijnanamaya Kosha and (e) Causal Sheath or Anandamaya Kosha.
The practices of Pranayama work mainly with Pranamaya Kosha. The Pranamaya Kosha is made up of five major Pranas which are collectively known as Pancha Prana: Prana, Apana, Samana Udana and Vyana.
UDANA
Throat is the seat for Udana and its main function is deglutition (swallowing of the food). It takes the Jiva to sleep. It separates astral body from the physical body at the time of death.
PRANA
It is not cosmic Prana, it is one part of the Pranamaya Kosha governing the area between larynx and diaphragm. Centre of is heart and its function is respiration.
SAMANA
Its seat is in the Navel region and digestion is its main function.
APANA
The seat of Apana is anus, below the navel region. The main function of Apana is excretion or expulsion of waste from the body.
VYANA
Vyana is all pervading. It performs circulation of blood.
Along with these five major Pranas there are five Upa-pranas (sub pranas). They are Naga, Kurma, Krikara, Devadatta and Dhananjaya. Naga is responsible for belching and hiccups. Kurma opens the eyes and stimulates the blinking. Krikara generates, induces hunger and thirst, sneezing and coughing. Devadatta causes sleep and yawning and Dhananjaya causes decomposition after death.
Page-63
Some more points about Breath:
There are 15 breaths per minute under normal condition. So there e 21,600 breaths per day. Our life is nothing but count of breaths. The breath that we exhale is greater in volume than what we inhale (lake in). So with every breath there is loss of life span every moment. It can be reduced with correct breathing and rhythmic deep breathing practice. An elephant takes 7 breaths a minute and lives for hundred years with good health. A tortoise breathes 5 limes per minute and lives for 500 years. So if we correct our breathing process and make a habit of deep breathing, then it is possible for us to live longer with healthy body and mind.
Breath is the bridge between the body and subtle mind. Control of Breath means control of mind. It is easy to bring the mind under Control with the practice of Yogic breathing techniques. By the all-pervading consciousness, the Pranic energy works and through Prana our mind and nerves etc. function. Right from the very conception in the mother's womb, Prana starts its function before all other Indriyas come into existence, till death. That is why Prana is considered the oldest and the best among all. Prana, mind, nerves body are all interlinked. It is told those who know Prana know Brahman. Through the ladder of Prana one can transcend body, mind and reach the Supreme Harmony SAMADHI.
Sectional Breathing:
This is a preparatory breathing practice for doing Pranayama. It mainly corrects the breathing pattern and increases the vital by of the lungs. It has 3 sections: -
(i)Abdominal breathing/Diaphragmatic breathing: - It can be done tiling or lying posture. If lying, lie on the back comfortably. Exhale completely. Then inhale slowly, continuously and to the Capacity. This is called Puraka. Keep the awareness on the men. Feel it is bulging up continuously. Hold for a second Kumbhaka). Then exhale- (Rechaka). While exhaling, feel that abdomen is drawn inwards continuously and slowly, stop for a second- (Bahya-Kumbhaka). Repeat the breathing cycle. Avoid jerks in the whole process. It should be smooth, continuous and relaxing.
Page-64
(ii)Thoracic/Chest breathing: - In this sectional breathing inhalation and exhalation are performed by expanding and contracting the chest only. Air flows through both nostrils slowly and continuously. The diaphragm is in control to avoid bulging up the abdomen. This type of breathing activates the middle lobes and opens them properly.
(iii)Clavicular/upper lobal breathing: - Keeping the diaphragm under control, start chest breathing and with effort take little more air. The air is forced to the upper most regions of the lungs and thus upper lobes become active. This clavicular breathing is clearly visible at the time of asthmatic attack.
(iv)Yogic breathing: - Combination of all the three section breathing is called yogic breathing. During inhalation there will be the experience of expansion of abdomen, chest and upper lobe o the lungs sequentially and during exhalation both the lungs will be relaxed from upper level to lower level i.e. from clavicle area t abdomen, gradually in a sequence. With the practice of this yogic breathing all the systems will be toned. If lust, greed, anger a jealousy crop up, immediately start yogic breathing and they w get no place to stay. A good physique and sound mind is the key keep up eternal youthfulness.
Points to remember for correct breathing: -
(a)Breathe always through nose, not through mouth. If there is congestion, practice Jal Neti and Sutra Neti to open the blockage.
(d)Avoid jerking, check unnatural sound, etc.
(e)Add Auto-suggestion and become aware of the whole system of the breath, i.e. movement, length, volume, density, temperature spontaneous sound, etc.
Page-65
PRANAYAMA FOR NADI-SHUDDHI
The Prana cannot enter the Nadis freely if they are full of impurities. Therefore, first of all, they should be purified and then Pranayama should be practised. Two processes, viz., Samanu and Nit Nirmanu, purify the Nadis. The Samanu is done by mental process with Bija Mantra. Physical cleansing or the Shatkarmas does the Nirmanu.
I .Sit on any meditative posture. Meditate on the Bijakshara of Vayu a which is of smoke colour. Inhale through the left nostril. Repeat the Bijakshara 16 times. This is Puraka. Retain the breath till you repeat the Bija 64 times. This is Kumbhaka. Then exhale through the right nostril very slowly till you repeat the Bijakshara 32 times. This is Rechaka.
2. The navel is the seat of Agnitattva. Meditate on this Agnitattva. Then draw the breath through the right nostril repeat I6 times the Agni Bija ja (R). Retain the breath till you count the Bija 64 times. Then exhale slowly through the left nostril till you repeat mentally the Bija letter 32 times.
3. Fix the gaze at tip of the nose. Inhale through the left nostril repeating the Bija 16 times. Retain the breath till you repeat the Bija oa 64
times. Now imagine that the nectar that flows from the moon runs through all the vessels of the body and purifies them. Then hole slowly through the right nostril till you repeat the Prithvi Bija ya 32 times.
However, such high proportions of inhalation /retention/ iodation are unnecessary. The ratio has to be adjusted to Individual capacity. Maintain the ratio 1:4:2.
Imagine that the Nadis are purified nicely by the practice of the above three kinds of Pranayamas and the Pranic energy is flowing through each channel freely.
Page-66
Exercise No. 1
I CHANDRA NADISODHAN: - Slowly inhale and exhale through left nostril closing the right nostril with right thumb. Do it 12 times comfortably; it makes one round.
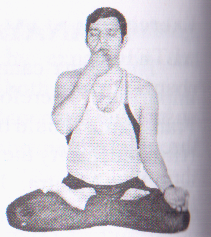
II SURYA NADI SODHAN: - Now close your left nostril with right ring finger, open the right nostril and start inhalation and exhalation through it 12 times comfortably. This is one round.
In the first week of practice, do one round each side. Then in the second week of practice do two rounds and in the third week do three rounds. Rest a while when one round is completed. You can increase the number of rounds according to your strength and capacity. Avoid unnatural sound during practice.
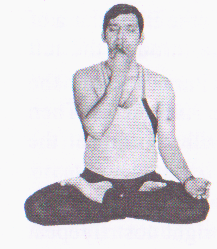
Exercise No. 2
Inhale through both the nostrils slowly and gently. Do not retain the breath. Then exhale slowly. Do it 12 times. This constitute one round. You can do 2 to 3 rounds according to your capacity and strength.
Exercise No. 3
I CHANDRA BHEDA: - Close the right nostril with right thumb. Inhale through left and exhale through right nostril. Repeat: it 12 times.
II SURYA BHEDA: - Close the left nostril with right ring finger. Inhale through right and exhale through left nostril. Repeat it 12 times. This is one round. Here you can introduce the ratio of inhalation and exhalation 1:2.
Page-67
Exercise No. 4
ALTERNATE NOSTRIL BREATHING: - Close the right mitt I with your right thumb. Then inhale slowly through your left nostril, close the left nostril with right ring finger and exhale through right nostril. Then inhale through right nostril and exhale through left nostril. Maintain the ratio 1:2. This is one round repeat like this this 12 times.
Exercise No. 5
STARTING OF INNER RETENTION: - Here, in this stage, Antar Kumbhaka or internal breath retention is introduced. Close the right nostril and breathe in slowly through the left nostril and mentally count 5. At the end of inhalation, close both nostrils and retain the breath with chin lock (Jalandhar Bandha) and mentally count 5. Then release the chin lock and breathe out through right nostril and mentally count 5. After exhalation, inhale through right nostril and mentally count 5 keeping the left nostril closed with right ring finger. Again closing both, retain with chin lock, and then release the chin lock and open the left nostril breathe out through left and mentally count 5. So 1:1:1 should be the ratio in the 1st stage of breath retention.
After a few days of practice come to the 2nd step and maintain the Ito 1:2:2, then in the 3rd step maintain the ratio 1:3:2 and ultimately come to the ratio 1:4:2. After mastering one stage gradually move further and further to reach 1:4:2. Afterwards one can introduce Bahir Kumbhaka also.
Sequence:
Nadi sadhana should be done after mastering Asana and heating or cooling Pranayamas and before Bhramari and Ujjayi Pranayamas.
Page-68
Benefits:
Nadi Shodhana ensures that the whole body is nourished by an extra supply of oxygen. Carbon dioxide is efficiently expelled and the blood is purified of toxins. The brain centres are stimulated to work efficiently to their optimum capacity. It also induces tranquillity, clarity of thought and concentration and is recommended for those engaged in mental works. It increase vitality and lowers the level of stress and anxiety by harmonizing the Pranas. It clears Pranic blockages and balances Ida and Pingala Nadis. It causes Prana to flow through Sushumna Nadi which leads to deep states of meditation and spiritual awakening.
KAPALABHATI
(Frontal Brain Cleaning) Pranayama
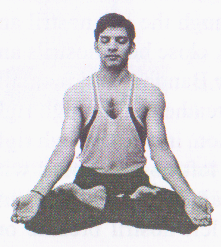
'Kapala' is a Sanskrit word; it means skull 'Bhati' means to shine. The term 'Kapalabhati' means an exercise that makes the skull shine. This Kriya cleans the skull. It is taken as one of the Shatkriyas (six cleansing process in Hath Yoga).
Technique:
Sit in any comfortable meditative pose. Keep the spine straight upright. Keep the face relaxed and eyes closed. Relax the whole body. Keep your awareness on frontal skull and brain. Concentrate on the tip of the nose. Inhale deeply through both the nostril Exhale with a force. Do not strain, just give little push at the low abdomen with every exhalation. Inhalation should be spontaneous passive, with no effort. Perform 10 respirations to begin with Count every respiration mentally. To start with, you can have on expulsion per second. Gradually you can have two expulsions p second. To begin with, do one round in the morning and one round in the evening consisting of 10 expulsions only. In the second week, increase it up to two rounds each time. Gradually a cautiously increase 10 expulsions to each round till you get 12 expulsions per round.
Page-69
Limitations:-
Those surfing from vertigo, epilepsy, stroke hernia or gastric ulcer should not practice Kapalabhati.
Benefits:
It cleanses the respiratory tracks or the nasal passages. It removes the spasm in the bronchial tubes. Consequently, Asthma is relieved and also cured in course of time. The apices of lungs get Proper oxygenation. It does not afford favourable nidus (breeding grounds) for tubercle bacilli. Therefore, consumption is cured by this practice. Lungs are considerably developed. Carbon dioxide and other impurities of blood are thrown out. Tissues and cells .absorb a large quantity of oxygen. The practitioner keeps up good health. Heart functions properly. The circulatory and respiratory system are toned up to a considerable degree. It balances and strengthens nervous system and tones the digestive organs.
BHASTRIKA (BELLOWS BREATHING)
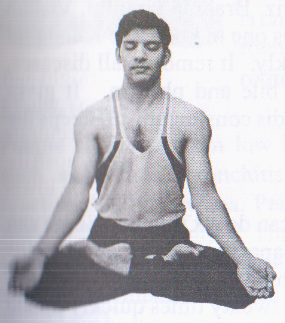
The Sanskrit word Bhastrika means 'bellows'. Thus, Bhastrika Pranayama is also known as bellows breathe, as air is drawn forcefully in and out of the lungs like bellows of a village blacksmith. The bellows increases the blow of air into the fire producing more heat. Similarly, Bhastrika Pranayama increases the blow of air into the body to produce inner heat at both the physical and subtle levels.
Page-70
Technique:
Sit in any comfortable mediation posture. Rest your hands on the knees with Chin Mudra. Keep the head, spine straight and upright. Eyes closed and relax the whole body. Keep the awareness on the abdomen (Manipura Chakra). Exhale completely. Start. Take deep breath in and breathe out forcefully through the nose. Don't strain, Inhale and exhale quickly 10 to 12 times like the bellows of black smith. Constantly dilate and contract. Hissing sound will be produced during the practice. Lastly, inhale deeply and hold comfortably with Moolabandha and Jalandhara Bandha. Then release the chin lock (Jalandhara Bandha) and exhale. Relax with normal breath.
Bhastrika is a powerful exercise. A combination of Kapalabhati and Ujjayi makes up Bhastrika. Practice Kapalabhati and Ujjayi to start with. Then, you will find it easier to do Bhastrika.
Benefits:
Bhastrika relieves inflammation of the throat, increases gastric fire, destroys phlegm, removes diseases of the nose and chest and eradicates asthma, consumption, etc. It gives good appetite. Breaks the three Granthis or knots, viz. Brahma Granthi, Vishnu Granthi and Rudra Granthi. It enables one to know the Kundalini. And also awakens the Kundalini quickly. It removes all diseases which arise due to excess of wind, bile and phlegm. It give warmth to the body. It purifies the Nadis considerably. It keeps the practitioner healthy.
Practice Note:
One must not go to extremes. Some can do six rounds. Some can do 12 rounds, according to their capacity. You can practice Bhastrika in the following manner. There is some slight change in the end. Having inhaled and exhaled twenty times quickly inhale through the right nostril; retain the breath as long as you can. Do it comfortably and then exhale through the left nostril. Then inhale through left nostril, retain the breath as before and then exhale through the right nostril.
Page-71
There are some varieties of Bhastrika where one nostril only is used lui breathing purposes and in another variety the alternate nostrils of o used for inhalation and exhalation.
Those who wish to do Bhastrika for a long time in an intense outliner, should live on Khichadi, and take an enema or do Basti in the morning before starting the practice.
Imitations:
I he same as in Kapalabhati.
SITALI PRANAYAMA
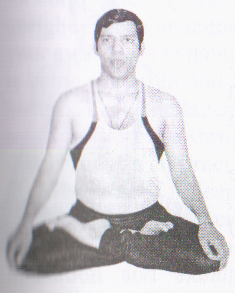
Sit comfortably. Keep the back, neck and head straight. Protrude the tongue a little outside the lips. Fold the tongue like a tube. Draw the breath through this tongue tube. At the end normalise the position of tongue, close the mouth, and exhale through nose. A feeling of icy coldness will be experienced through tongue. This is one round. Perform as many numbers of rounds as you need, at least 10 to 12 rounds or even more.
Limitations:
People suffering from low blood pressure, respiratory disorder as asthma, bronchitis and excessive mucus should not ice this Pranayama. Persons with heart disease can practice without breath retention. This practice cools down the activity of lower energy centres; therefore, those who are suffering from chronic bide constipation should avoid it. Generally, this Pranayama should not be practised in winter and in cold regions.
Page-72
Benefits:
This practice cools the body and mind as well. It purifies the blood. It quenches thirst and appeases hunger. It cools the system and cures Gulma (chronic dyspepsia), inflammation of various chronic diseases, fever, consumption, indigestion, bilious disorders, phlegm, the harmful effects of poison, snakebite e He, who practices this Pranayama regularly, will not be affect by the bite of serpent and scorpions. Sitali Kumbhaka is imitation of the respiration of a serpent. The practitioner gets power of casting his skin.
SEETKARI PRANAYAMA
Techniques:
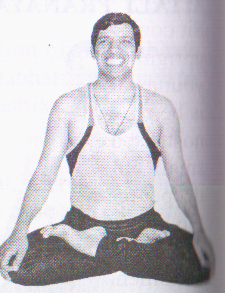
Sit in any comfortable meditative pose. Open the mouth. Fold the tongue and touch the upper palate with tip of the tongue. Join the two rows of teeth. Breathe in slowly and deeply through the teeth. Exhale through nose, keeping the mouth close. This is one round. One can do it 10 to 20 rounds.
Limitations:
Limitations are the same as for Sheetali Pranayama. Practitioner with sensitive teeth, missing teeth or dentures should practice Sheetali Pranayama instead.
Benefits:
Same as for Sheetali Pranayama, with the additional advantage that it keeps the teeth and gums strong and healthy.
Practice Note:
Through perfection of its practice, the adept becomes like the go Kamadeva. Kama means 'desire' and deva means 'master therefore, through this practice one can master the desires achieve purification
Page-73
UJJAYI PRANAYAMA
The Sanskrit word Ujjayi means 'Victorious'. It is derived from the root ji, which means 'to conquer' or to (Mitt ire by conquest', and the prefix ud, which means 'bondage. It is also known as the psychic breath, as it leads to subtle states of mind and is used together with Khechari Mudra.
Technique:
Sit comfortably in any meditative posture with spine straight and upright. Keep awareness of natural breath. After sometime shift pair awareness to the throat. Try to feel or imagine that the breath is being drawn in and out through the throat and not through the nostrils, as if inhalation and exhalation are taking place through a toll hole at the throat. As the breathing becomes slower and deeper, gently contract the glottis so that a soft snoring sound like it breathing of a sleeping baby is produced in the throat. If it is practised correctly there will be a simultaneous contraction of the) men. This happens by itself, without any effort. Both inhalation and exhalation should be slow, long, deep and controlled. The sound of the breath should not be very loud. It should just be audible to the practitioner but not to another person loss they are sitting very close.
After becoming proficient in practice, Ujjayi may be performed with Khechari Mudra and Bandhas during breath retention. It can practised in any posture viz: sitting, standing, lying.
Limitations:
Persons with heart disease should not have breath retention with Bandhas. An introvert person and person with depression should avoid this practice.
Page-74
Benefits:
It is classified as a tranquilizing Pranayama and it also has a heating effect on the body. It soothes the nervous system and calms the mind. It has a profoundly relaxing effect at the psychic level. It helps to relieve insomnia and may be practised in Shavasana just before sleep. It is also useful for persons having high blood pressure. It removes disorders of the Dhatus, which are the 7 constituents of the body: blood, bone, marrow, fat, semen, skin and flesh.
SURYA BHEDA PRANAYAMA
The Sanskrit word Surya means 'sun', which refers to Pingala Nadi, while Bheda means 'to pierce “pass through' or 'awaken'. So Suryabheda means to pierce or purify Pingala Nadi.
Technique:
Take any sitting posture keeping body straight and upright. Let the hands rest on the knees with Chinmudra. Close the eyes and relax the whole body. Adopt Pranayama Mudra and close left nostril with right ring finger and inhale deeply through right nostril. Then closing both hold with Jalandhara and Moola Bandhas. Hold for a few seconds. Release the Moola Bandha and then Jalandhara Bandha. Exhale, while raising the head up, through left nostril by keeping the right closed with thumb. This is one round. Repeat up to 10 or more rounds according to your capacity. Don't strain.
Limitations:
People suffering from heart disease, hypertension, high blood pressure, or epilepsy should not practice this Pranayama.
Page-75
Benefits:
It creates heat in the body and counteracts imbalances of the Vata Dosha or wind elements. It stimulates and awakens the Pranic energy by activating Pingala Nadi. By increasing extroversion and dynamism, it enables physical activities to be performed more efficiently and helps to alleviate depression. It is helpful to dull and lethargic persons or who find it difficult to communicate with external world. It makes the mind more alert and perceptive and is an excellent premeditation Pranayama. It is also useful in the treatment of low blood pressure, infertility and worms.
BHRAMARI PRANAYAMA
The word Bhramari means 'bee' and the practice is so called because a sound is produced which imitates that of the black bee.
Technique:
Sit comfortably; keep the spine straight and upright. Close the eyes and relax the whole body for a short time. The lips should remain gently closed with the teeth slightly separated throughout the practice. This allows the sound vibrations to be heard and felt more distinctly in the brain. Make sure the jaws are relaxed. Plug the ears with index fingers. Bring the awareness to the centre of two eyebrows where Ajna. Chakra is located, and keep the body still. Breathe in through the nose. Exhale slowly and in a controlled manner while making a deep, steady humming sound like that of the black bee. The humming sound should be smooth, even and continuous for the duration of the exhalation. At the end of exhalation, breathe in deeply and repeat the process.
Limitations:
Bhramari should not be done while lying down. People suffering from severe ear infections should not practice this Pranayama until the infection has cleared up.
Page-76
Benefits:
Bhramari relieves stress and cerebral tension, alleviates anger, anxiety and insomnia, and reduces blood pressure. It speeds up the healing of the body tissues and thus may be practised after surgical operations. It strengthens and improves the voice and eliminates throat ailments.
INTRODUCTION
In the previous chapters we have presented a few of the Asanas and Pranayamas along with other preparatory practices. Now we move on to Bandhas and Mudras. They are neuro-muscular locks and gestures. Bandhas are safety locks used during the process of breath holding Kumbhaka. These Bandhas and Mudras are advanced techniques in Hatha Yoga used mainly for controlling emotions. They also help the aspirants to still the mind.
Types of Bandhas:
There are four Bandhas: Jalandhara, Moola, Uddiyana and Mahabandha. Mahabandha is a combination of the first three Bandhas. These three Bandhas directly act on the three granthis or psychic knots. Moola Bandha is associated with Brahma Granthi, Uddiyana with Vishnu Granthi and Jalandhara Bandha with Rudra Granthi. The Granthis prevent the free flow of Prana along Sushmna Nadi and thus impede the awakening of the Chakras and the rising of Kundalini.
Jalandhara Bandha (Glottis Lock)
This is used for restraining the breath below the glottis after inhalation in Antar Kumbhaka. Inhale slowly and deeply, and retain the breath inside. While retaining the breath, bend the head forward and press the chin tightly against the chest. Straighten the arms and lock them firmly into position, pressing the knees down with the hands. Simultaneously, hunch the shoulders upward and forward. It will intensify the pressure applied to the neck. Stay in the final position for as long as the breath can be held comfortably. Do not strain. Slowly release the Bandha, raise the head to the upright position and exhale.
Page-77
Moola Bandha (Anus Lock)
In Siddhasana, press the perineum with the left heel, keep the right heel above the genital organs and contract the anus. After inhalation perform Jalandhara Bandha and contract the perineal vaginal region and hold the contraction as tightly as possible. Do not strain. This is the final lock. Hold it as long as the breath can be comfortably retained. Slowly release Moola Bandha and bilandhara Bandha, raise the head to the upright position and exhale.
Uddiyana Bandha (Fly-Up-Lock)
Ud"Di' in Sanskrit means 'fly up'. Here it is said that for the Yogi who practices this regularly, his 'prana' moves up through the subtle centres. The significance of Uddiyana is to restrain the breath and hence is called a Bandha or lock.
Exhale through the mouth with a whoosh, emptying the lungs as much as possible. Hold the breath outside. Contract the abdominal muscles inward and upward. Hold the abdominal lock and breathe outside for as long as you can, without straining. Slowly release the Bandha and inhale.
Malta Bandha (The Great Lock)
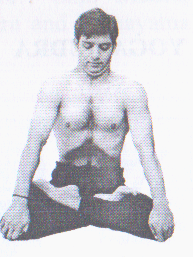
It is done during outward holding of breath or Bahya Kumbhaka. Exhale forcefully and completely through the mouth. Retain the breath outside. Successively perform Jalandhara, Uddiyana and Moola Bandhas in this order. Hold the Bandhas and the breath for as long as is comfortable without straining. Then release Moola, Uddiyana and Jalandhara Bandhas in this order. Inhale slowly when the head is upright. This is one round.
Page-78
MUDRAS
Mudras in general are used mainly in three fields:
(a) Dance (to express the feelings and emotions through bodily gestures).
(b) Rituals (in performing certain worships), and
(c)Hatha Yoga (to help in stabilizing the mind).
We will limit ourselves to the region of Hatha Yoga, which includes Asana, Pranayama, Shatkriyas, Bandhas and Mudras. Many of the Yoga texts take Bandhas and Mudras as a single unit.
The Mudras that we have practised in the class are: Ashvinimudra, Shanmukhi Mudra and Yoga Mudra Ashvinimudra is useful in evoking the spiritual forces dormant in the lower centres. It is useful for women in carrying stage, and in curing urinary and anal incontinence. Ashvini Mudra done In Viparitakarani posture is useful in treating piles and prolapsed uterus.
SHANMUKHI MUDRA
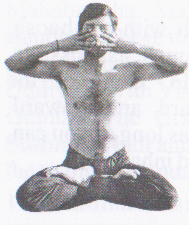
Next important Mudra is Shanmukhi Mudra. This Mudra is very helpful in taking the mind to meditation. It cuts off all external stimuli coming from the four special senses, 1.e. vision, hearing, smell and taste. Hence the mind can easily dwell in meditation by following fine internal sound of the breath along with a Mantra. It is useful for persons suffering from tension and headaches.
YOGAMUDRA
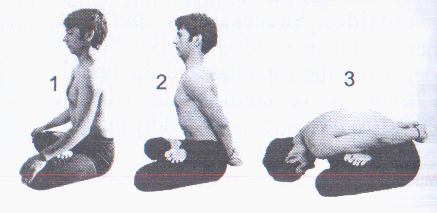
Page-79
Take the base position. Step by step come to Padmasana/Vajrasana.
Bring the hands back and hold one wrist with other hand. Inhale, stretch your spine and trunk upward.
Exhale, bend forward from the tailbone until the forehead touches the ground.
Will inhalation raise head, trunk etc. and come to starting position.
Duration
Hold for few seconds, only repeat 2 to 4 times. Keep the awareness on breathing and Manipur Chakra.
Limitations:
Persons with sciatica, high blood pressure, pelvic inflammatory disease or any other serious abdominal ailment should avoid the practice.
Benefits:
This alone is excellent for massaging the abdominal organs and removing many ailments of the area including constipation, indigestion. It stretches the spine and tones the spinal nerves. It removes anger, tension and induces tranquillity.
Check Points:
Buttocks shouldn't be lifted from the ground. Keep the back straight while bending forward.
Some minor Mudras we use generally are:- Chin Mudra, Chinmaya Mudra, Adi Mudra, Brahma Mudra and Pranayama Mudra or Vishnu mudra.
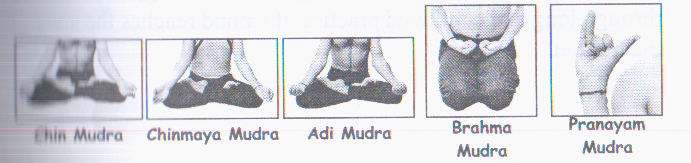
Page-80
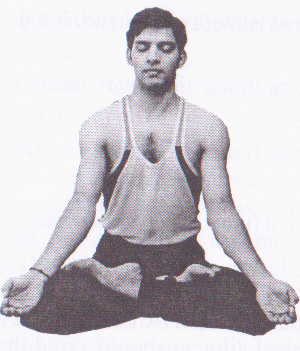
Meditation is the seventh limb according to the Yoga Sutras of sage Patanjali, the eighth being samadhi. Yama, Niyama, Asana, Pranayama and Pratyahara are called Bahiranga Yoga or external Yoga. Dharana, Dhyana and Samadhi are commonly known as Samyama or Antaranga Yoga (inner Yoga).
तव चित्त एकाग्रता धारणा Keeping the mind on a particular object for a short time is DHARANA or Concentration. There are various methods of concentration which ultimately leads to Dhyana —meditation.
प्रत्ययेकतानता ध्यानम Continuous concentration on an object for a long time is called Dhyana or Meditation. Mind is the instrument with which we meditate. There are mainly two ways of meditation they are: (1) constantly thinking on one object or thought, to the exclusion of all other objects or thoughts; and (2) keeping the mind free of all thoughts.
In the 1st method, one must concentrate one's mind on an object, or engage oneself in the repetition of the Mantra into which his preceptor has initiated him. When the concentration on one Mantra together with Bhava (feeling of its meaning), is increased through long and continued practice, the mind reaches the state of meditation.
Page-81
In the 2nd method, one should sit in a comfortable posture, close the eyes and relax all the limbs of the body from toes to the crown the head. By being aware of natural breath and by remaining a witness of the internal and external activities of the mind, the mind will become non-objectified after continued and unbroken practice for long period. In the early stage, care should be taken that one does not go to sleep. Sincerity, earnestness and purity of thought, word and deed are the important factors for success in the practice of Mediation.
The purpose of Yoga is to create harmony in the physical, vital, Mental, psychological and spiritual aspects of human being. In the foregoing pages of this book, we have described the techniques of relaxation in different postures, viz. standing, lying and sitting which bring in this harmony. Yoga is not a practice for hour or two in a day but it is the most scientific way of living, all the twenty-four hours of the day. During the whole day, you may be in one of these three postures and hence a skilful adjustment in them will effect the required harmony. योगस्थ कुरु कर्माणि- Be established in Yoga and do all your duties. योग कर्मसु कोशलम- Skill in action is Yoga. Skill here means to be in tune with nature of the Supreme Reality. तस्मात् योगी भवार्जुन- Be a Yogin always," is the loving instruction of Lord Krishna. Convert life into Yoga, so that you may ensure success in all the fields of activity. By regular practice, by using your presence of mind, skill and wisdom, you can become a Yogi and enjoy happiness and peace whatever be the circumstances and conditions in which you are placed.